
GuildeHall Network
Officer's Manual
Running your Guilde on GuildeHall Network. November 2026 edition.
To ask an AI assistant such as Claude or ChatGPT about GuildeHall, give it the AI edition of this manual: paste in the link, or save the file and attach it.
Contents
- How to use this manual
- GuildeHall Network at a glance
- Members and officers
- Guildes and Councils
- What's free, and what the Standard plan adds
- Part 1: Your first month
- 1. Sign in for the first time
- 2. Check your Guilde's details
- 3. Invite your officers
- 4. Set up dues
- 5. Schedule your events
- 6. Bring in your member list
- 7. Send your welcome letter
- Part 2: Running your Guilde
- Members and mailing list
- Add a new member
- Remove a member
- Resend an invitation
- Correct a member's name or email address
- Reset a member's password
- Sort members into groups with tags
- Download the member list
- Keep a mailing list of people who aren't members
- Move your mailing list over from Mailchimp
- Answer people who write through your public page
- Let people join with a link
- Hand the Guilde over to next year's officers
- Dues and money
- Record a check or cash payment
- See who has paid and whose membership has lapsed
- Change a tier's price
- Give a refund
- Find payouts and payments in Stripe
- Download payments for the treasurer or accountant
- What members see when they pay
- Letters and messages
- Write and send a letter
- Send yourself a test first
- Schedule a letter for later
- Send a letter to part of the Guilde
- Give your letters a masthead and a color
- Start this month's letter from last month's
- See who your letter reached
- Put a letter on your public page
- Post a notice members see when they sign in
- When a member says letters have stopped
- Events
- Create an event
- Set up a meeting that repeats
- Show an event on your public page and on GuildeHall's events directory
- Take free tickets for an event
- Check people in at the door
- Record who attended
- Ask for volunteers
- Change or cancel an event
- What members see
- Documents and committees
- Share the bylaws, minutes, and other documents
- Control who can see a document
- Set up a committee and its page
- The wall and the forum
- Post an announcement on the wall
- Organize the forum
- Handle a reported post
- Your public page
- See your public page as a stranger sees it
- Choose public, private, or secret
- Join a Council
- Your plan
- Move to the Standard plan
- Change your billing or card
- Your own account
- Change your password
- Use two-step sign-in, and what to do without your phone
- Control what other members see about you
- Choose which emails you get
- Work in more than one Guilde
- Leave a Guilde
- Put GuildeHall on your phone's home screen
- Download your data, or delete your account
- Part 3: Help
- Frequently asked questions
- Getting help
- Glossary
- Appendix A: Welcome letter to your members
- Appendix B: What to have ready for Stripe
How to use this manual
Part 1, "Your first month," covers the seven jobs that get a Guilde running. Read it straight through, in order, because each job builds on the one before it. Most take under half an hour. The exception is dues, where Stripe takes up to a day or two to review your Guilde's details.
Part 2, "Running your Guilde," covers everything else. Its tasks are grouped by the kind of work, such as members, dues, letters, and events. Look one up in the table of contents or the index when you need it.
Every task follows the same pattern. It opens with how long it takes and what to have ready. Numbered steps follow, and each step is one thing you do on the screen in front of you. Words in bold are exactly what you'll see on the screen: a menu entry, a button, or a box to fill in. Some headings and buttons appear on screen in capital letters, so Save details may read SAVE DETAILS. Each set of steps ends with what you'll see when it has worked.
Part 3 answers common questions and explains how to get help.
This edition describes GuildeHall Network as it stood in November 2026.
GuildeHall Network at a glance
GuildeHall Network gives your Guilde one private place online for work that is now spread across several tools.
| Instead of | You'll use |
|---|---|
| A member list in one person's spreadsheet | Members, a list every admin can open, which updates as people join |
| Dues by check, cash, and payment apps | Dues, where members pay online into your Guilde's own bank account and you record the checks and cash that still arrive |
| A newsletter service or a long email chain | Letters, written and sent from Communications |
| A group text or a Facebook group | The Wall for announcements, and the Forum for longer discussions |
| Bylaws and minutes in someone's inbox | Documents, where every member can find them |
| A calendar kept by one person | Events, where members can say whether they're going |
Members and officers
Everyone in your Guilde is a member. Members see the top half of the menu: Wall, Events, Messages, Forum, Roster, Documents, Committees, My Account, and Membership once your Guilde takes dues. Officers you make admins also see the Admin half, where they add members, collect dues, send letters, and change the Guilde's settings. A Guilde can have as many admins as it likes, at no charge. One person can belong to several Guildes with a single account.
Guildes and Councils
A Guilde is any group on GuildeHall: your association, club, or society. A Council joins together Guildes of the same kind, such as the neighborhood associations of one city, so they can share a forum and a public page. Councils are optional.
What's free, and what the Standard plan adds
Members never pay anything to use GuildeHall.
Guilde Free costs nothing for a Guilde of up to 150 members. It includes the member list, events, the wall, the forum, messages, documents, committees, your public page, Councils, and as many admins as you like. It also sends letters by email to all your members, up to 1,000 emails a month.
Guilde Standard costs $290 a year, or $29 a month. It adds collecting dues online and the full newsletter: letters to your mailing list or to part of the Guilde, with photos, your own masthead and color, and scheduling. It also lifts the 150-member limit. If your Guilde joined as one of GuildeHall's charter Guildes, it has Standard at no charge for the period in your agreement.
Guilde Premium costs $590 a year, or $59 a month, and adds priority support. Its other features, including treasurer's reporting and a custom web address, are still being built, so Standard suits most Guildes for now.
GuildeHall takes nothing from your dues. Members' payments go straight into your Guilde's bank account. Stripe, the payment company that handles the money, keeps its standard fee of about 2.9% plus 30¢ for each card payment.
Part 1: Your first month
These seven tasks get your Guilde running. The first five set everything up before your members arrive, so that when they sign in for the first time, the calendar is filled in and dues are ready to pay. The last two bring your members in and welcome them.
In this manual, an officer is anyone who holds a position in your Guilde, and an admin is anyone with access to the Admin pages. Most officers are admins, but the two are set separately, as task 3 explains. The steps on the Members and Dues pages are written for a computer, because those pages are laid out differently on a phone.
1. Sign in for the first time
Takes: about five minutes, or ten if you also turn on two-step sign-in. Have ready: the email from GuildeHall with the subject "Set up your account - [your Guilde's name]."
GuildeHall sends you that email when you're added to the Guilde. Its link works for seven days. If it has expired, ask whoever added you to send it again.
Set your password
- Open the email and click Set Up Your Account.
- Type a password in Password, then type it again in Confirm Password. It needs at least eight characters, including an uppercase letter, a lowercase letter, a number, and a symbol such as ! or #. The list under the boxes ticks off each rule as you meet it.
- Click Set Password. The page says Account Ready.
- Click Sign In. Enter your email address and your new password, and click Sign In again.
You'll land on your Guilde's home page.
If you already have a GuildeHall account, for example because you belong to another Guilde, you'll get a different email instead, titled "[name] invited you to join [Guilde name]." Click Accept invitation, then Sign in to accept. Sign in with your existing password, and click Accept and join [Guilde name].
Find your way around
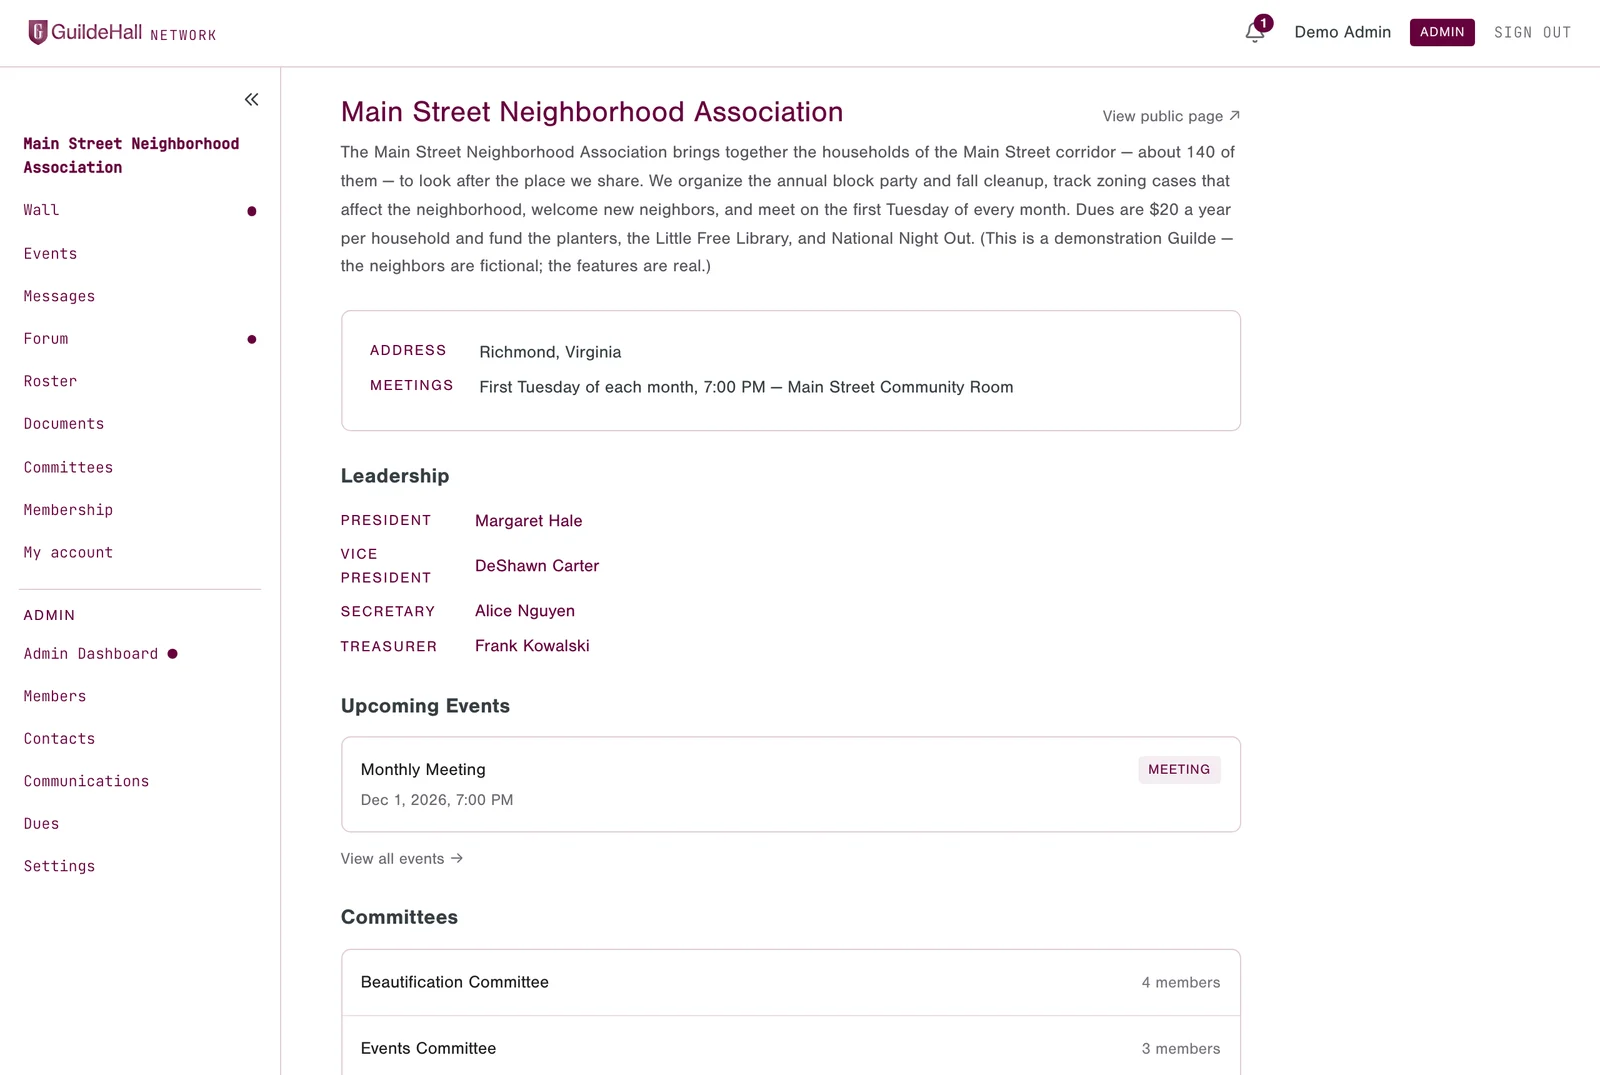
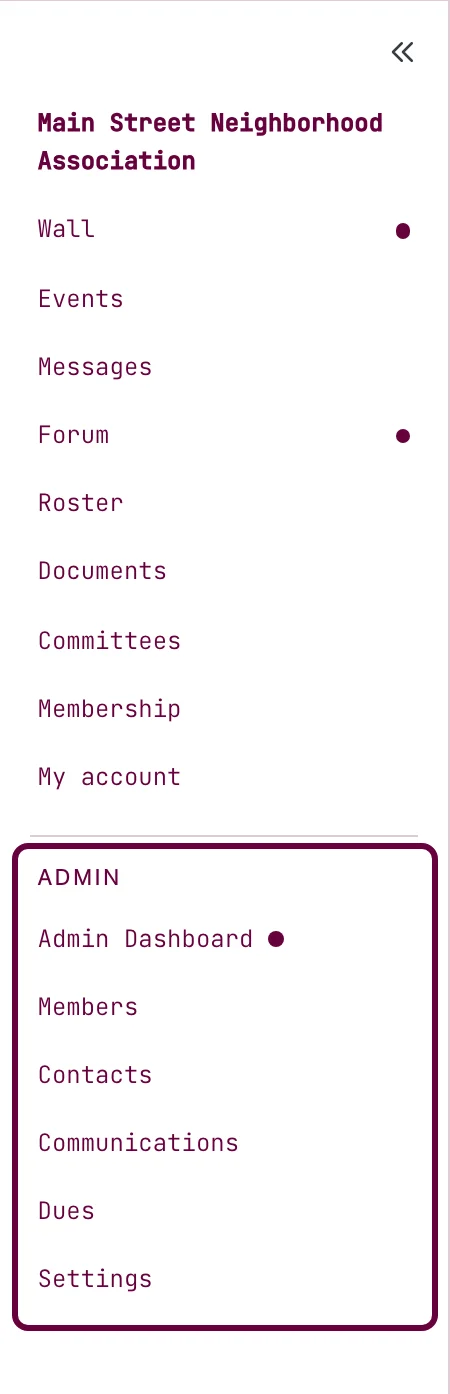
On a computer, the menu runs down the left side of the screen. On a phone, tap the menu button, the three short lines at the top of the screen, to open it.
The top half of the menu holds what every member sees. Your Guilde's name, at the very top, takes you back to the home page. If you belong to more than one Guilde, it reads My Guildes instead. Below it are Wall, Events, Messages, Forum, Roster, Documents, Committees, and My Account. Once your Guilde takes dues, Membership appears there too.
The bell at the top of the screen holds your notices, such as a reply to one of your posts or a new event. A number on it shows how many you haven't read.
Under the heading Admin are the pages only admins see:
- Admin Dashboard shows your Guilde's figures. When something is waiting for you, such as a message from someone who found your public page, it appears there under "Needs your attention."
- Members is your member list.
- Contacts is your mailing list of people who aren't members.
- Communications is where you write letters to members.
- Dues is where you set up and track dues.
- Settings holds your Guilde's details, visibility, and plan.
Turn on two-step sign-in (optional)
Two-step sign-in is optional, and GuildeHall recommends it for admins. As an admin, you can see members' contact details and, once dues are on, the Guilde's payments. With two-step sign-in, someone who learns your password still can't sign in without your phone.
You'll need a computer and your phone. Two-step sign-in uses an authenticator app on the phone, which shows a new six-digit code every thirty seconds. If you don't have one, install Google Authenticator or Microsoft Authenticator from your phone's app store. Both are free.
- On your computer, click My Account in the menu.
- Below Change Password, find the Two-step sign-in section and click Set up two-step sign-in. A square barcode, called a QR code, appears on the screen.
- Open the authenticator app on your phone and choose to add an account by scanning a QR code. Point the phone's camera at the code on your computer screen. If the camera won't read it, choose to enter a key in the app instead, and type the key shown under the QR code.
- Type the six-digit code the app now shows into the box on the computer screen, and click Turn on.
- The screen shows ten backup codes. Each one lets you sign in once if you lose your phone, and they won't be shown again. Click Download to save them as a file, or Copy to paste them somewhere safe, and keep them somewhere other than your phone.
- Check I've saved these codes somewhere safe, and click Done.
The Two-step sign-in section now shows On. From now on, after your password, GuildeHall asks for the six-digit code from your app. If your phone isn't with you, click Don't have your phone? Use a backup code and type one of the codes you saved.
2. Check your Guilde's details
Takes: about fifteen minutes. Have ready: any of these you have: the Guilde's website and public email address, its meeting schedule and location, a mailing address you're willing to show publicly, and a few sentences about what it does.
These details appear on your Guilde's home page, which members see, and on its public page if the Guilde is public.
Fill in the details
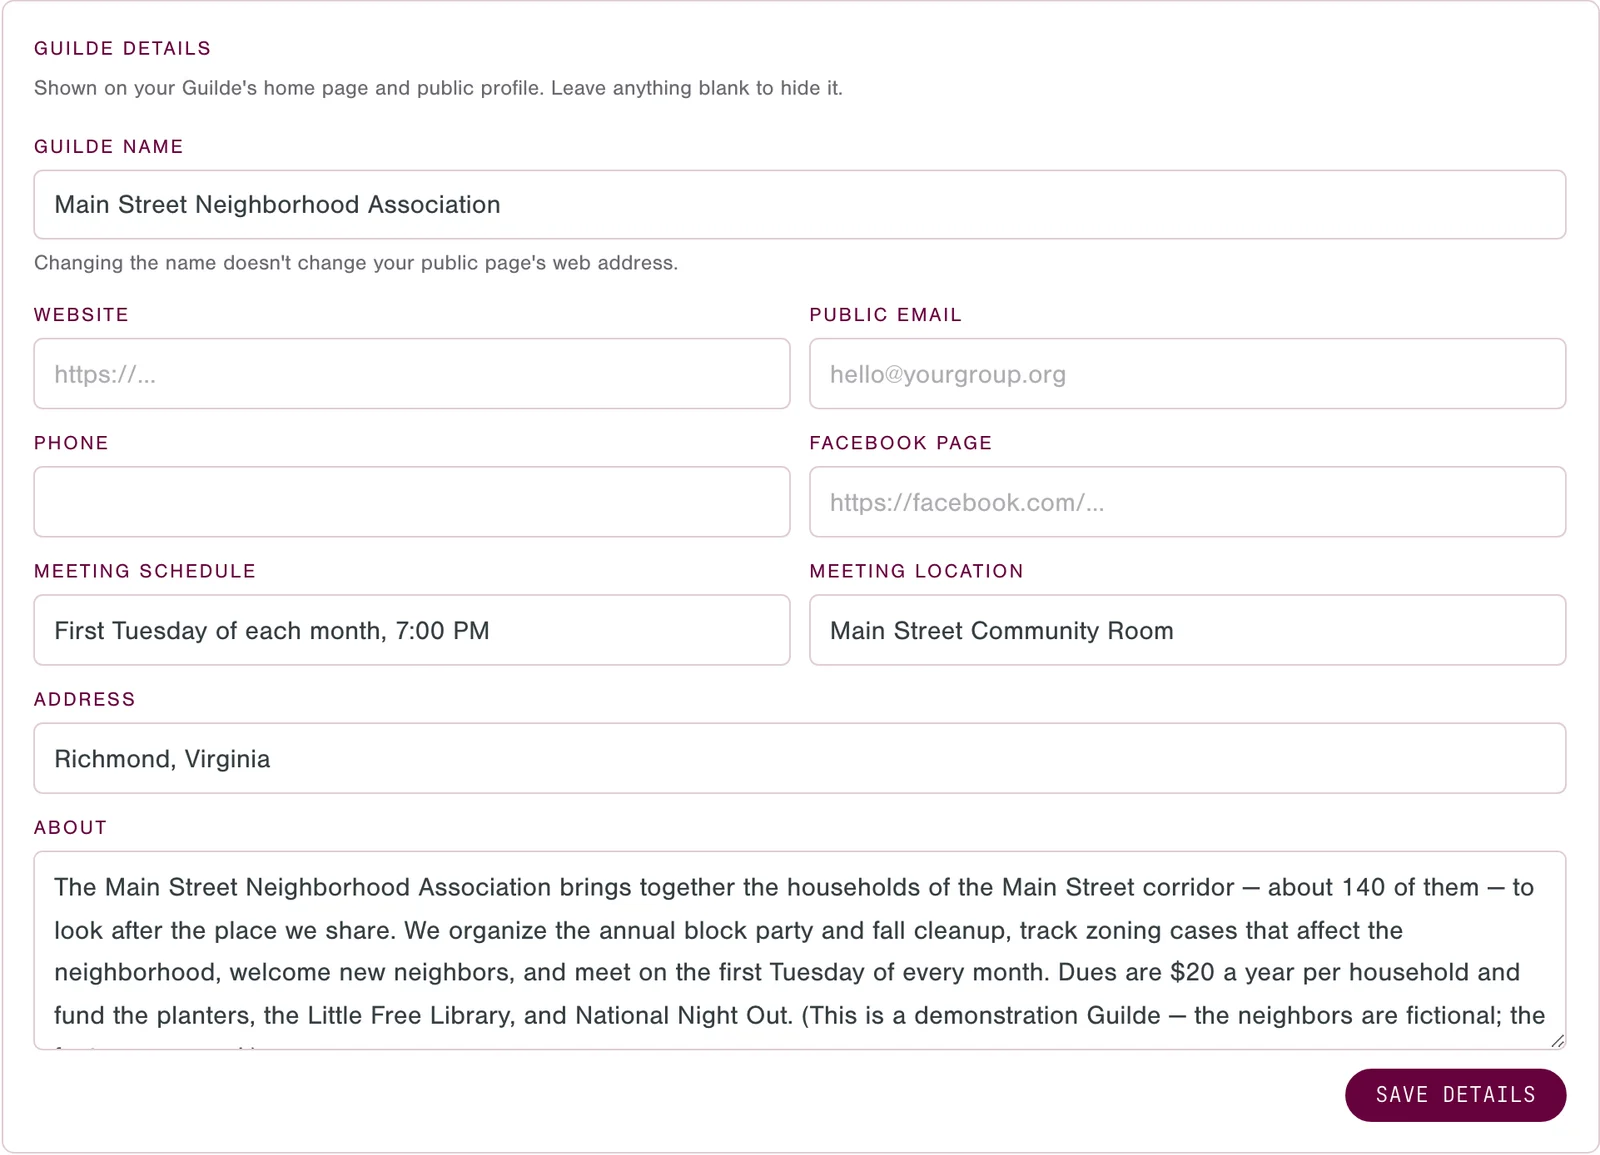
- In the menu, click Settings.
- In the Guilde Details card, check the Guilde name and correct it if it's wrong. Then fill in Website, Public email, Phone, Facebook page, Meeting schedule, Meeting location, Address, and About. Anything you leave blank stays hidden.
- Click Save details. A message at the top of the screen says "Guilde details saved."
Two of these boxes matter for letters, which you'll send in task 7. Replies to your letters go to the Public email, so if it's blank, members can't reply. Every letter also carries the Address at its foot, and the letter editor warns you when it's missing. If the Guilde is public, the address also appears on its public page, so use the Guilde's own mailing address or a post office box, not an officer's home.
If you changed the Guilde name, the message says "Guilde renamed," and the page reloads to show the new name. It changes everywhere in GuildeHall, including the menu, the public page, and letters. The public page's web address stays the same. If your Guilde already takes dues online, its Stripe account keeps the old name, which members see when they pay and on their card statements. Whoever owns the Stripe account changes it in the Stripe Dashboard, under Settings, then Public details.
Choose who can find your Guilde
Every Guilde is public, private, or secret, and you can change the setting later.
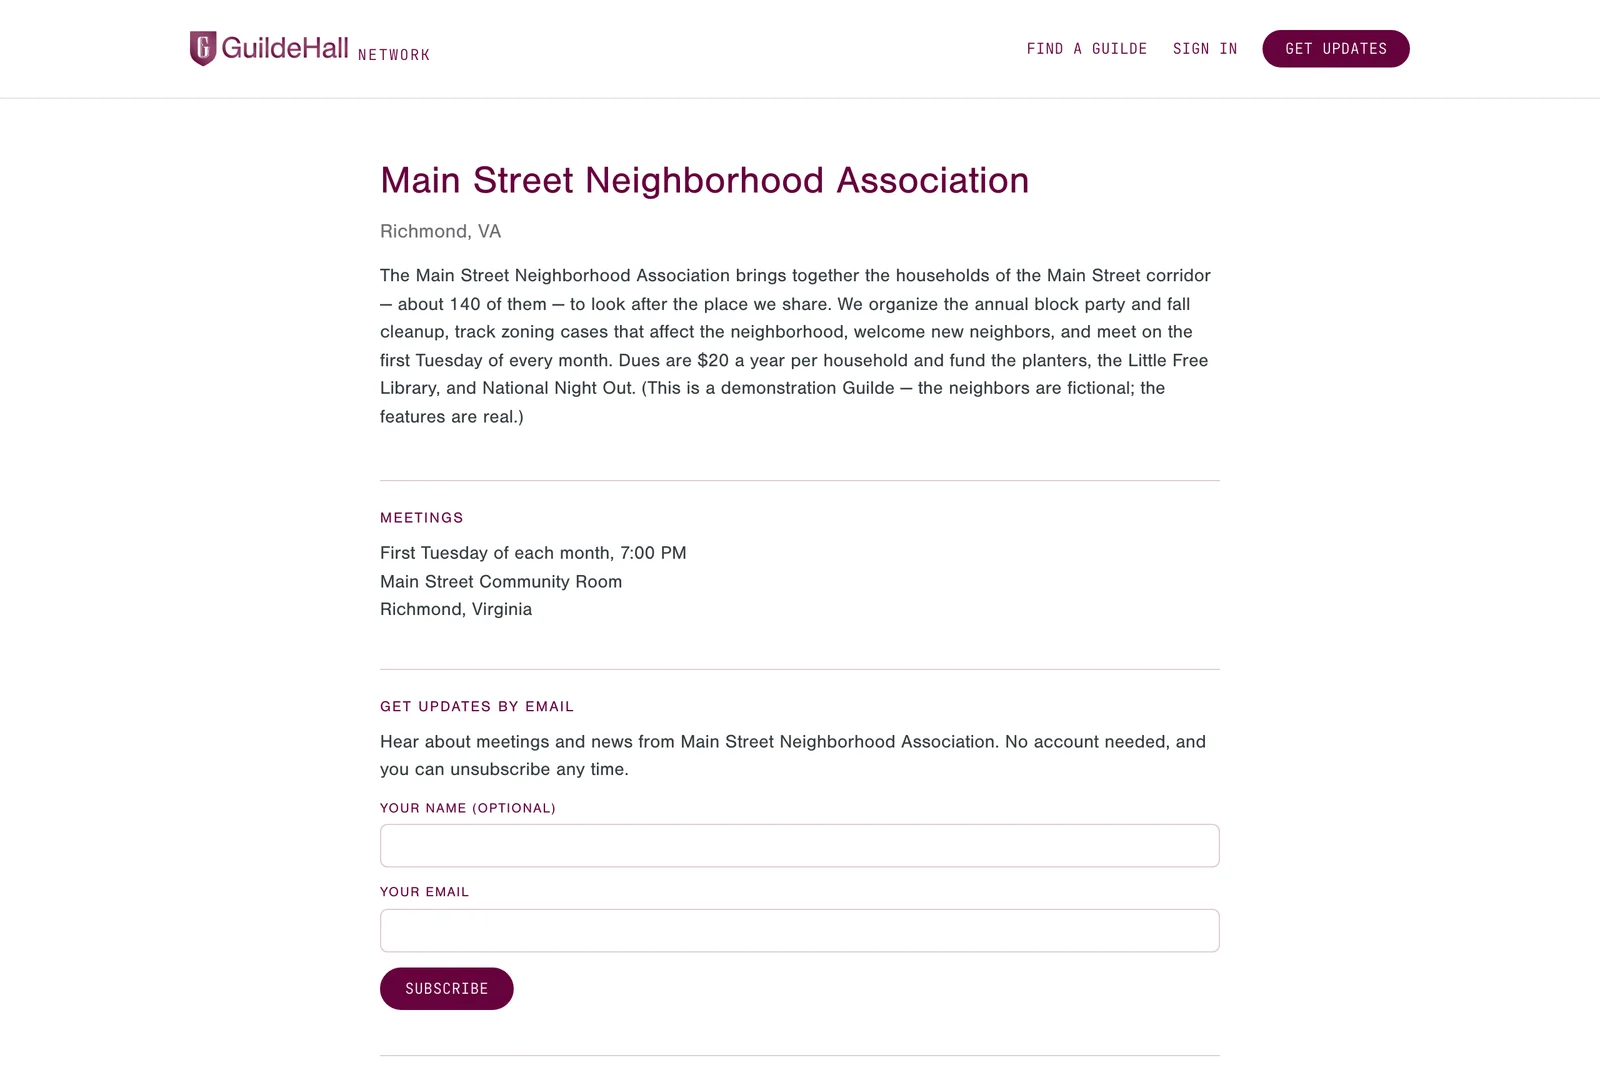
- A public Guilde has a page anyone can find, showing its description, meeting times, officers, and the events and posts you choose to show. It suits groups that want new members and want joining to be easy.
- A private Guilde's page shows only its name, its city and state, and "Membership by approval," with a form to ask to join. It suits groups that approve each new member.
- A secret Guilde has no public page at all, and people join only through an invitation link or when an admin adds them. It suits groups that want no presence online.
None of the three stops a member from passing along what they read inside the Guilde.
- On the Settings page, in the Guilde Visibility card, choose Public, Private, or Secret.
- Click Save. The card says "Saved. The Guilde is now public," or private, or secret.
Look at your public page
- Click your Guilde's name at the top of the menu to go to the home page.
- Click View public page ↗, beside the Guilde's name. Your public page opens in a new tab, as a stranger would see it.
A secret Guilde has no public page, so the link doesn't appear.
Check your plan
Online dues require Guilde Standard. Letters by email work on every plan: Guilde Free sends them to all your members, and Standard adds your mailing list and more. On the Settings page, the Guilde Plan card shows which plan your Guilde is on. If it says Guilde Standard, either paid or complimentary through a date, you're ready for task 4.
If it says Guilde Free and you want Standard:
- In the Guilde Plan card, choose Annual or Monthly. Annual costs $290 a year, and monthly costs $29 a month.
- Click Choose Standard. Stripe's payment page opens.
- Enter the card the Guilde pays with, and confirm.
Stripe brings you back to Settings, and the card says "Thank you. Stripe is confirming your payment; this takes a moment." After a moment it says "This Guilde is on Guilde Standard," with the date of the next renewal.
3. Invite your officers
Takes: about five minutes for each officer. Have ready: each officer's name, email address, and title, such as Treasurer.
Making an officer an admin is like giving them edit access to a shared spreadsheet. They can add members, send letters, and change the Guilde's settings. There's no limit on admins and no charge for them, on any plan.
An officer's title is set separately from admin access. The title is how they're listed on your home page and public page.
Make each officer an admin
- In the menu, click Members, then Add Member.
- Fill in First Name, Last Name, and Email, and Phone if you have it.
- Check Make them an admin.
- Click Add Member.
The officer appears in the list with Admin in the Role column, and GuildeHall sends them the setup email from task 1. Ask each officer to complete task 1.
If the officer is already a member of your Guilde, don't add them again. Instead, find their row on the Members page, click ⋯ at the end of it, and choose Make admin, then confirm. Their Role changes to Admin.
Give officers their titles
- In the menu, click Settings.
- In the Leadership card, under Add someone, start typing the officer's name in Find a member by name, and choose them from the list.
- Type their title, such as Treasurer, or choose one of the suggestions, and click Add.
- Repeat steps 2 and 3 for each officer.
- Use the up and down arrows beside each name to put them in order, with the president first.
The public page shows each officer's first name and last initial only, such as "President Margaret W." You can give a title to an officer who already had a GuildeHall account before they accept the invitation. The search marks them as invited, and their name appears on the public page at once.
When an officer steps down
On the Members page, click ⋯ on their row and choose Remove admin role, then confirm. They stay a member. Then, on Settings, click Remove beside their name in the Leadership card, and confirm. You can't remove your own admin role this way. "Hand the Guilde over to next year's officers," in Part 2, explains how to pass on your own role.
4. Set up dues
Takes: about fifteen minutes, then anywhere from a few minutes to a day or two while Stripe reviews the Guilde's details. Have ready: Guilde Standard (see task 2), and the items listed under "What to have ready" below.
The treasurer usually does this task, because whoever does it becomes the person responsible for the Guilde's Stripe account, and their email becomes the Stripe login used to see payouts and give refunds. If you aren't the treasurer, hand this task to them once they've completed task 1.
Stripe is the payment company that handles the money. When a member pays dues online, the money goes from their card to the Guilde's own bank account. GuildeHall never handles it and takes none of it.
What to have ready
- The Guilde's legal name and mailing address, exactly as they appear on its tax records.
- The Guilde's tax ID number, if it has one: its EIN (Employer Identification Number) or its nonprofit ID number.
- Whether the Guilde is incorporated as a nonprofit or is an unincorporated association. If you aren't sure, ask the Guilde's president or check its founding papers before you start.
- The routing number and account number of the Guilde's own bank account. Payouts go there, so don't use a personal account.
- Your date of birth and the last four digits of your Social Security number. Stripe requires these from the person responsible for every US account. GuildeHall never sees them.
- A mobile phone that can receive text messages.
Appendix B is a printable version of this list with space to fill it in.
Start in GuildeHall
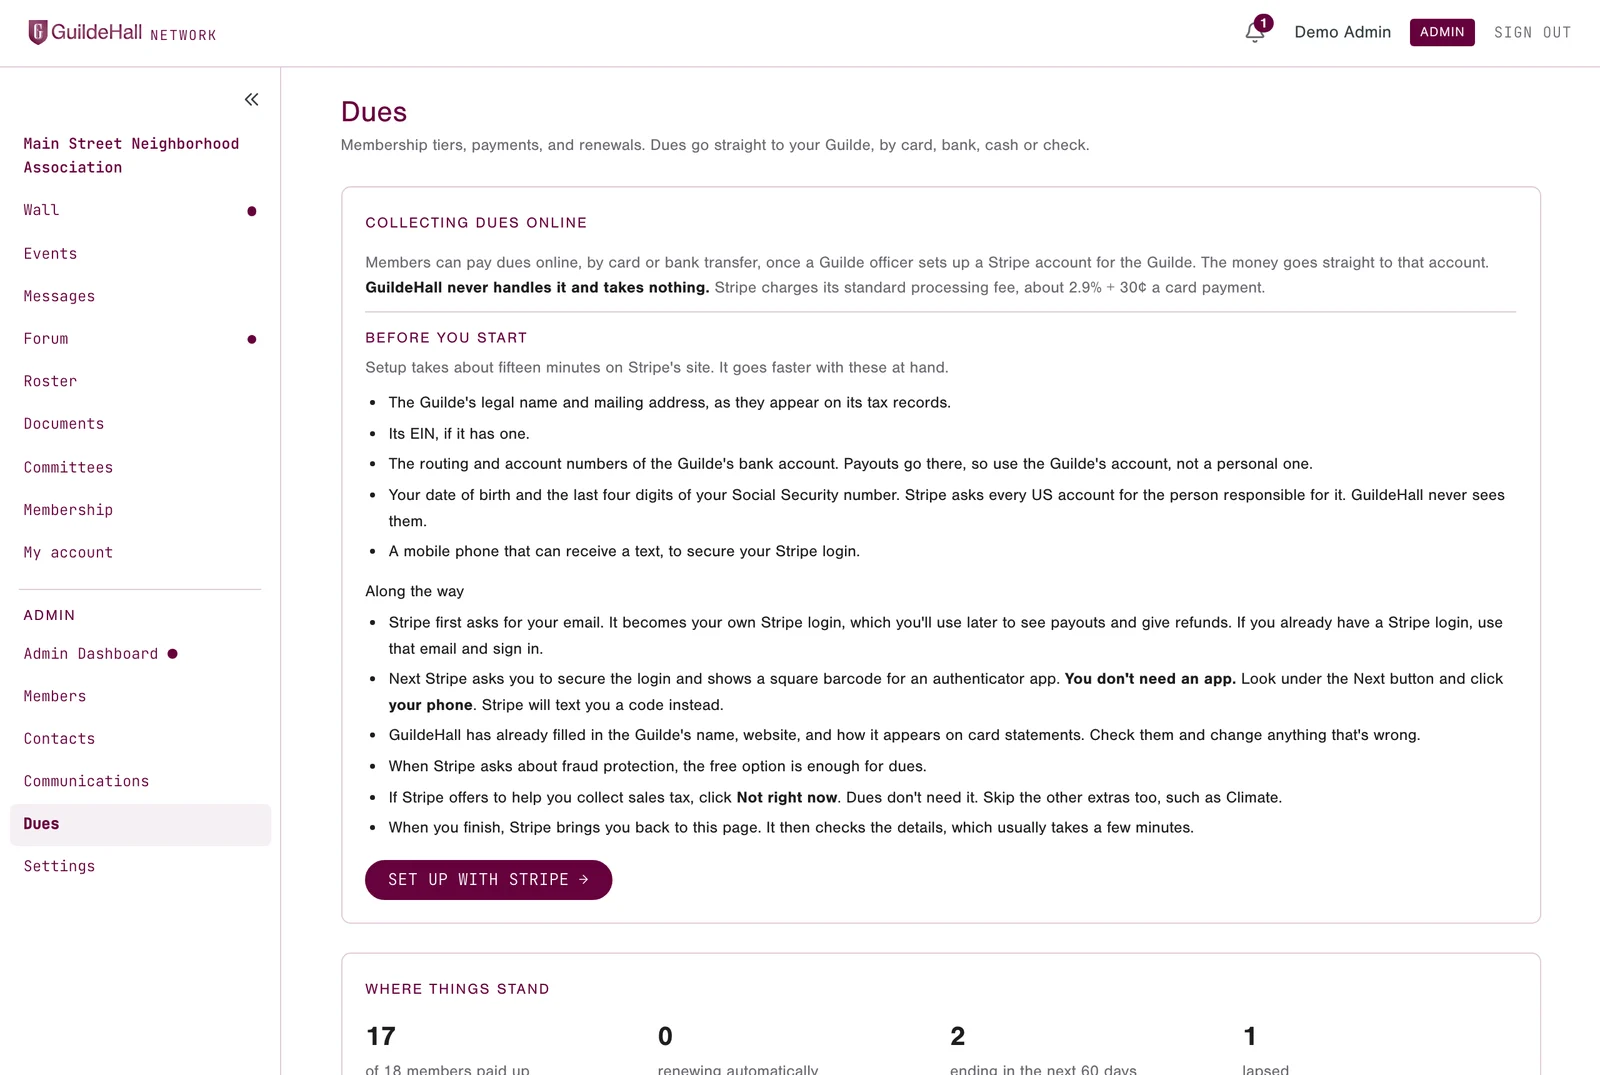
- In the menu, click Dues.
- In the Collecting dues online card, click Set up with Stripe →. Stripe's website replaces the GuildeHall page.
Finish on Stripe's website
Stripe asks for the items on your list as you go. If you need to stop partway, close the tab. When you later go back to Dues in GuildeHall, the card says "Stripe needs a few more details," and Finish Stripe setup → takes you back to where you left off.
- Enter your email address. It becomes your Stripe login. If you already have a Stripe login, use that email and sign in.
- Stripe asks you to secure your login. If you set up an authenticator app in task 1, you can scan Stripe's QR code with it. Otherwise click your phone, in the small line under the Next button, to have Stripe text you codes instead.
- For the type of business, choose the nonprofit option. If Stripe then asks how the Guilde is organized, choose incorporated or unincorporated to match what you noted under "What to have ready."
- Enter the Guilde's legal name, address, and tax ID number if it has one, and your own details as the person responsible.
- GuildeHall has already filled in the Guilde's public name, its website, and how its charges will appear on members' card statements. Check each one and correct anything that's wrong.
- If Stripe asks about fraud protection, choose the free option.
- If Stripe offers to help collect sales tax, click Not right now, since GuildeHall's dues checkout doesn't charge sales tax. Also skip Climate, an optional program that gives part of each payment to carbon removal, and any other extras Stripe offers.
- Add the Guilde's bank account. Stripe may offer to connect it by signing in to the bank. You can do that, or choose to enter the routing and account numbers by hand.
- Review the details and agree to Stripe's terms.
Stripe sends you back to the Dues page, which says "Stripe is checking your Guilde's details." That usually takes a few minutes, and sometimes a day or two. If a Stripe screen doesn't match these steps, see "Getting help" in Part 3.
Add your membership tiers while Stripe checks
A tier is one kind of membership with its own price and length, such as Individual at $20 a year or Household at $35 a year. Members choose one when they pay.
- On the Dues page, click Add a tier.
- In Name, type the tier's name, such as Household.
- In Price, type the price. Under it, the form shows how much the Guilde will receive after Stripe's fee, and what to charge to receive a round number, for example "To receive $40.00, charge $41.50." Change the price if you'd like the Guilde to receive the round number.
- In Length, choose how long the membership lasts.
- Under Covers, choose Just one person, A household, or A business. For a household or a business, enter how many people it covers in Up to.
- Add a Description if you like.
- Leave Offer automatic renewal checked if you want members to be able to renew automatically at the end of each term. Each member decides when they pay. Uncheck it to offer only one-time payments for this tier.
- Click Add tier.
- Repeat steps 1 to 8 for each tier.
When Stripe has finished checking, the card at the top of the Dues page says Dues are on., and Membership appears in every member's menu, where they can pay online.
Record the checks and cash that still arrive
Some members will keep paying by check or in cash. Record each payment so that GuildeHall shows who has paid. This works whether or not online dues are on.
- On the Dues page, in the Payments card, click Record a payment.
- In Member, search for the member's name and choose them.
- In Tier, choose their membership. For a household or business tier, fill in the household or business name.
- In Paid by, choose Check, Cash, Other, or Complimentary for a free membership.
- Make sure the Amount, which starts at the tier's price, and the Date paid, which starts at today, are right. Add a note, such as the check number, if you like.
- Leave Email [first name] a receipt checked to email the member a receipt, or uncheck it.
- Click Record payment.
A message says the member is now paid up through a date, and the payment appears in the Payments list. The receipt gives your Guilde's name, the tier, the amount, the date paid, and the dates the membership covers. You can also record a payment from the Members page by clicking ⋯ on the member's row and choosing Record dues payment.
5. Schedule your events
Takes: about five minutes for each event. Have ready: the date, time, and place of your next meeting, and of anything else on the calendar.
Create your regular meeting
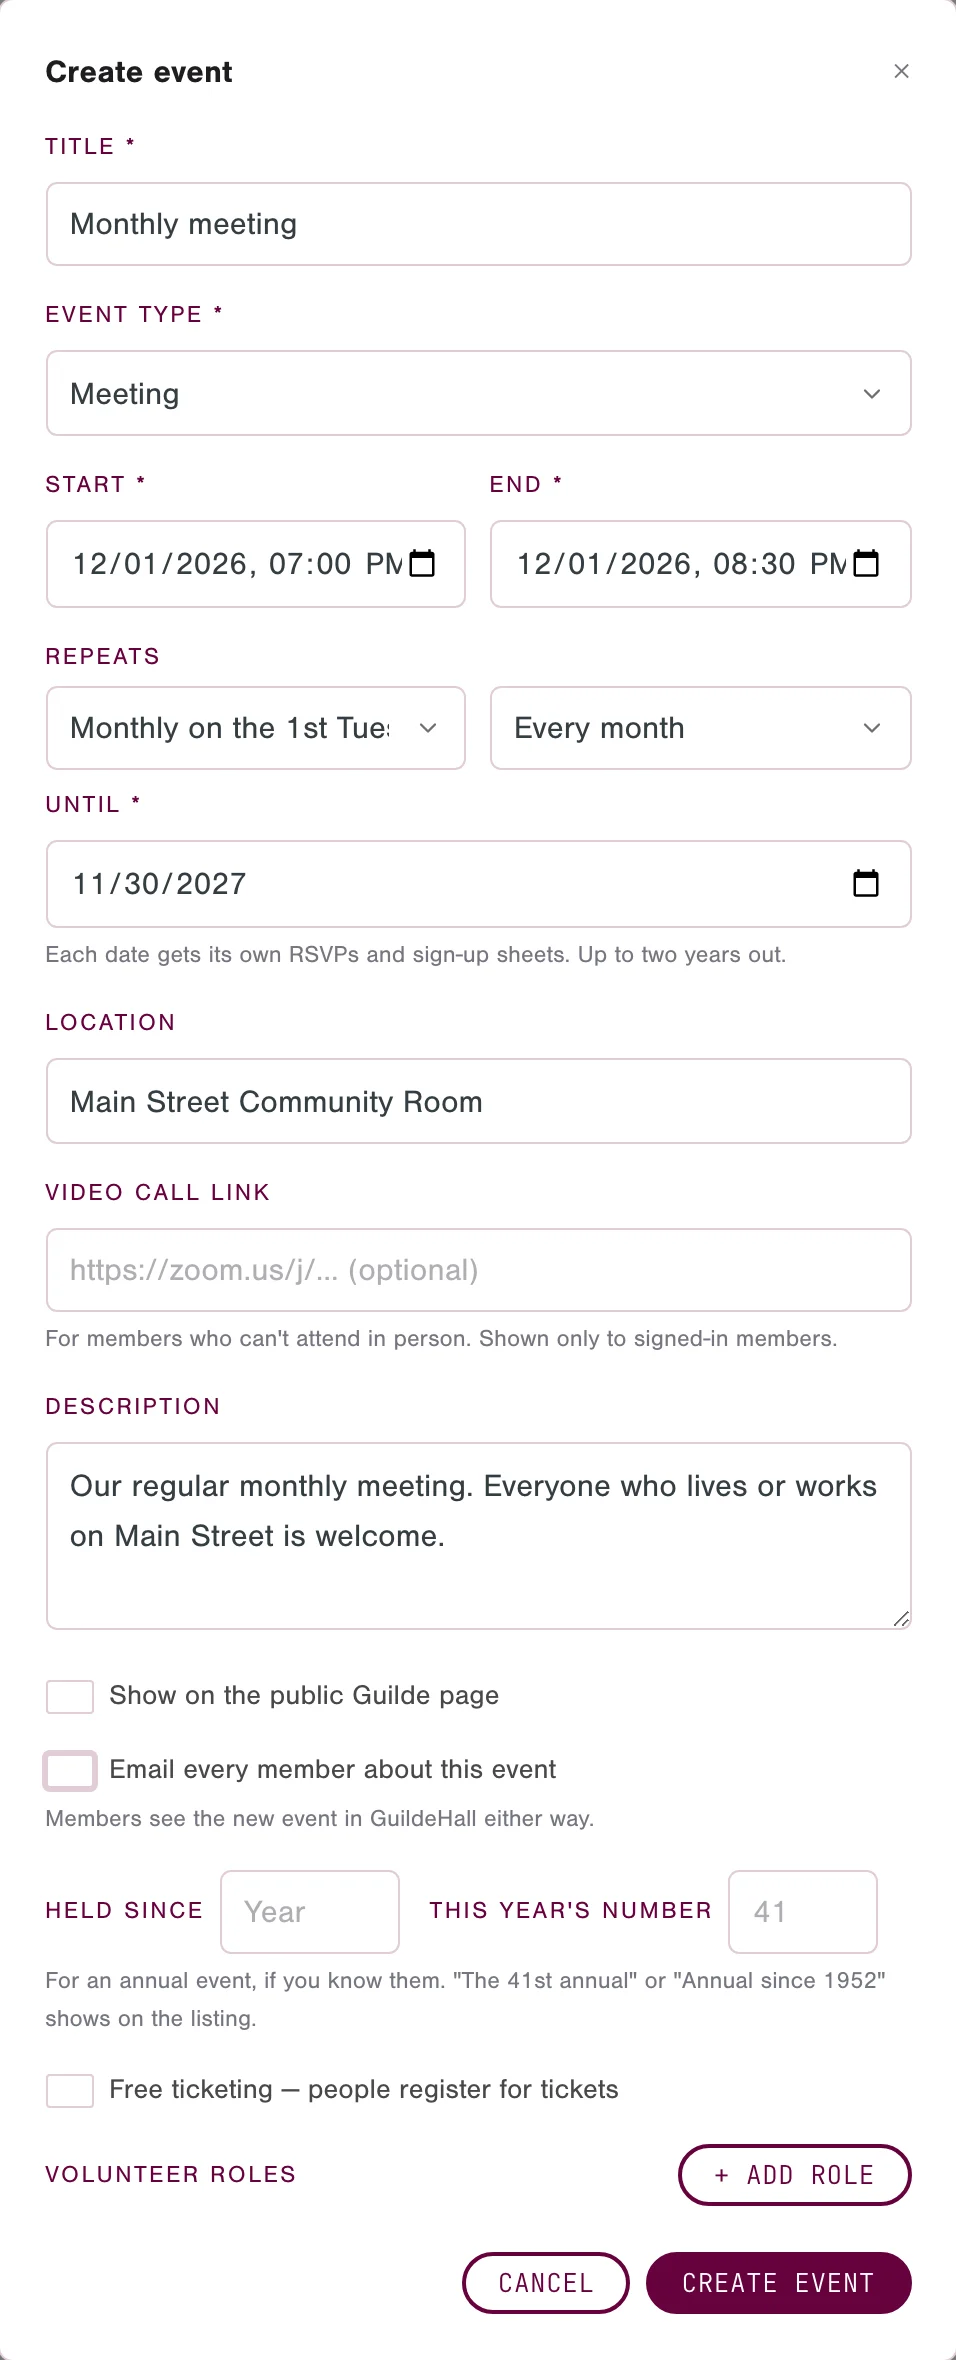
- In the menu, click Events, then New event.
- Fill in Title, such as Monthly meeting, and choose an Event type, such as Meeting.
- Set the Start and End date and time of the next meeting.
- If the meeting repeats, choose how in Repeats, for example "Monthly on the 1st Tuesday." Then set Until to the last date you want on the calendar, up to two years ahead, or 100 dates, whichever comes first.
- Fill in Location. If members can also join by video call, paste the link into Video call link. Only signed-in members see it.
- Add a Description if you like.
- If your Guilde is public, you can show the meeting on its public page as well as to members: check Show on the public Guilde page. For a repeating meeting, every date becomes public, and the public page lists the next one. Private and secret Guildes have no public page, so the box doesn't appear.
- Leave Email every member about this event checked to send every member an email about it, or uncheck it to skip the email. Members see the new event in GuildeHall either way. While you're trying things out, uncheck it, so that a test event doesn't reach the whole Guilde.
- Click Create event.
The meeting now appears under Events. A repeating meeting is listed once, at its next date, with a line such as "Every month on the 1st Tuesday." Each date keeps its own list of who's coming.
Change whether an event is on your public page
- On Events, click the event to open it.
- Under the title, check or uncheck Show on the public Guilde page.
- If the event is one date of a repeating meeting, a window asks which dates to change. Click This and all future dates, or Only this date.
An event on the public page shows a Public label above its title. The box appears only in a public Guilde.
If your Guilde is public, its public events also appear in the events directory on guildehall.com. To keep them off the directory, go to Settings, and in the GuildeHall Events card uncheck List our public events on GuildeHall Events.
Part 2 explains free tickets, checking people in at the door, and asking for volunteers.
6. Bring in your member list
Takes: about fifteen minutes to import a spreadsheet, or a minute for each member you add by hand. Have ready: your member list in a spreadsheet, with at least each member's first name, last name, and email address. Also have the welcome letter from task 7 ready to send, because members get their setup emails the moment you bring them in.
Each member needs their own email address. If two people in a household share one, GuildeHall accepts only the first. Add the second person later with an address of their own, or leave them off for now.
Prepare the spreadsheet
- In the menu, click Members.
- Click Import CSV, then Download CSV Template. A spreadsheet file named import_template.csv downloads to your computer.
- Open the template in Excel or Numbers by double-clicking it. In Google Sheets, choose File, then Import, then Upload, and choose the file.
- Leave the first row exactly as it is. It holds the column headings: first_name, last_name, email, phone, address_line1, address_line2, city, state, zip_code, and date_of_birth.
- Copy your members into the rows below, one member to a row, with each piece of information under its heading. If your list has each person's whole name in one column, split it into first and last names. Only first_name, last_name, and email are required, so leave any other column blank if you don't have it. Write dates of birth as year, month, and day, as in 1968-04-23.
- Save the file in CSV format:
- In Excel, choose File, then Save As, and pick CSV UTF-8 (Comma delimited) as the format. If Excel warns that some features will be lost, continue. That's expected.
- In Google Sheets, choose File, then Download, then Comma-separated values (.csv).
- In Numbers, choose File, then Export To, then CSV.
A file can hold up to 500 members. If your list is longer, split it into two files and import each one. On Guilde Free, the import stops when the Guilde reaches 150 members, counting the officers you've already added, and any rows past that are listed as skipped, with a note about upgrading.
Import it
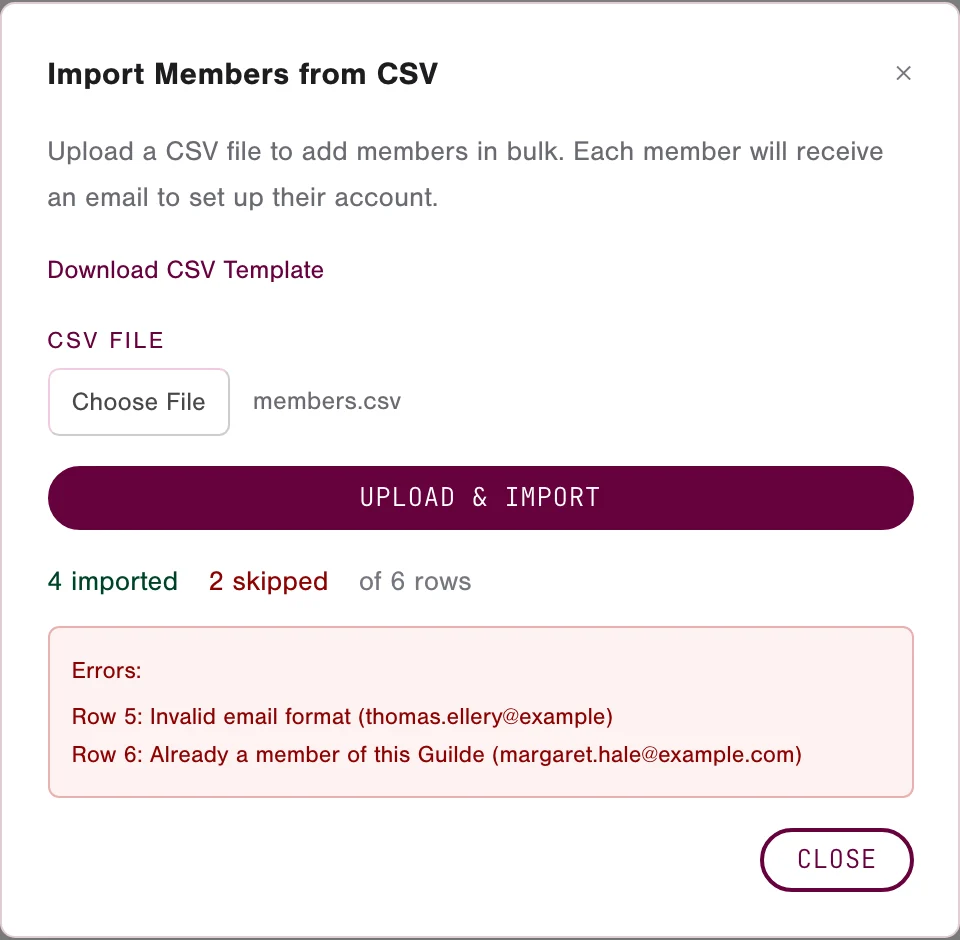
- Back on the Members page, click Import CSV.
- Under CSV File, choose the file you saved, and click Upload & Import.
- Read the result. It says how many members were imported and how many were skipped, and it lists each skipped row with the reason, such as "Invalid email format."
- If any rows were skipped, correct them in your spreadsheet, save it again, and repeat steps 1 to 3. Members already brought in are skipped with "Already a member of this Guilde," so nobody is added twice.
- Click Close.
Your members now appear in the list. Send the welcome letter in task 7 now.
Add one member at a time
- On the Members page, click Add Member.
- Fill in First Name, Last Name, and Email, and Phone if you have it.
- Leave Send invite email to set up account checked.
- Click Add Member. A message confirms that the setup email has been sent.
What members receive
Each new member gets the setup email you received in task 1, titled "Set up your account - [your Guilde's name]," with a button to choose a password. Its link works for seven days. A member who already has a GuildeHall account gets an invitation to accept instead.
See who hasn't set up an account
On the Members page, the Status column shows Not set up for anyone who hasn't chosen a password yet, and Invited for anyone with an existing account who hasn't accepted the invitation, and Inactive for an account that has been turned off. Everyone else shows nothing there. The Admin Dashboard also tells you how many members haven't set up their accounts.
Rows marked Not set up or Invited also show when the last email went out. If a member says it never arrived, or its link has expired, click Resend on their row, then confirm. A Not set up row shows Send invite instead if no setup email has gone out yet. If you mistyped someone's name or email address, "Correct a member's name or email address" in Part 2 explains how to fix it.
7. Send your welcome letter
Takes: about twenty minutes. Have ready: the welcome letter in Appendix A, and the date and place of your next meeting.
The welcome letter tells members that the Guilde has moved to GuildeHall and what to do next. Send it right after task 6, so that it arrives alongside their setup emails.
These steps work on every plan. On Guilde Free, the letter goes to all of your members in GuildeHall's standard look.
Write the letter
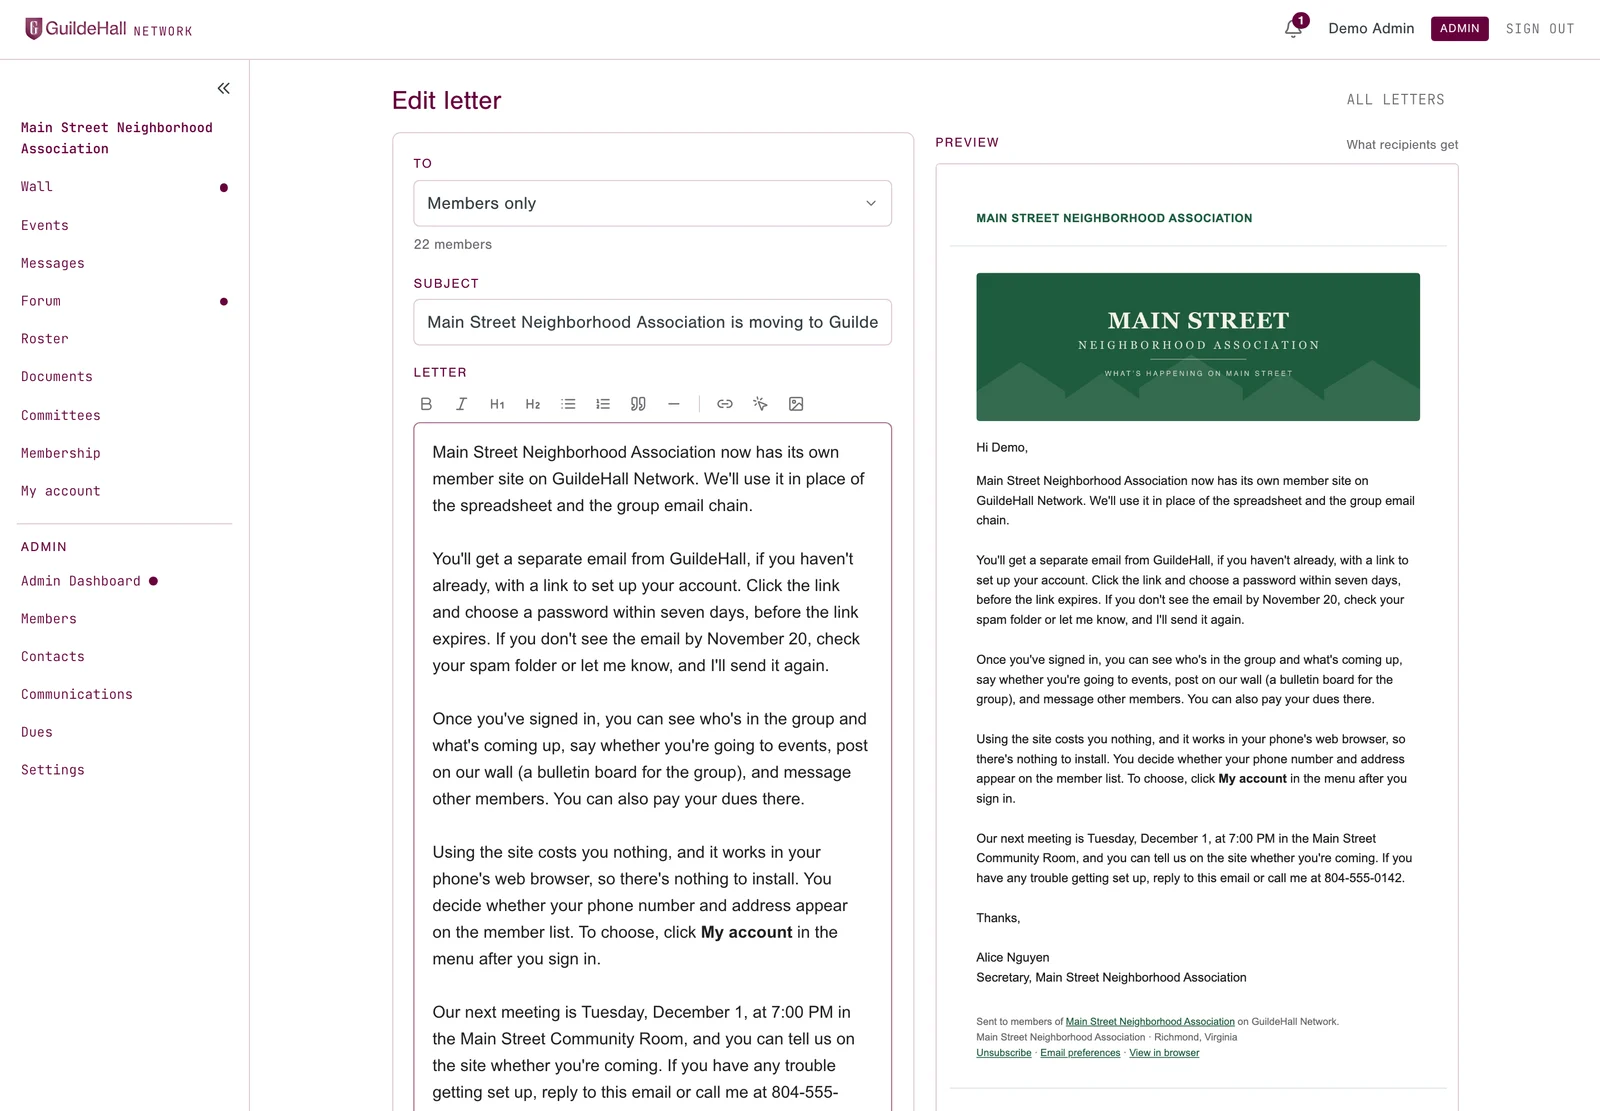
- In the menu, click Communications, then Write a letter.
- In To, choose Members only. On Guilde Free, To shows All members, its only choice. The line below shows how many members it will reach. Members who were invited with an existing account and haven't accepted yet aren't counted, and won't receive the letter.
- In Subject, type the subject from Appendix A, with your Guilde's name filled in.
- Copy the letter from Appendix A into the Letter box, starting with its first paragraph. GuildeHall adds a greeting with each member's first name, so leave out "Hi everyone" and the subject line. Fill in every blank in square brackets, and delete the sentence about dues if your Guilde doesn't take dues online.
GuildeHall saves your draft a few seconds after you stop typing. On a wide screen, the right side shows the letter as members will see it. On a smaller screen, click or tap Preview to see it, and Write to go back.
Send yourself a test
- Click Send test to me.
- Open the test in your own inbox, and check that every blank is filled in and the letter reads the way you want.
Send it
- Click Send. A window asks you to confirm and shows how many people the letter will reach. A letter can't be unsent.
- Click Send now.
GuildeHall opens the letter's own page. Its Delivery card counts the copies the mail service has accepted and, as they arrive, the copies delivered to members' inboxes. The counts update while the letter goes out. Reload the page later to see how many copies were delivered.
Part 2: Running your Guilde
Look these tasks up when you need them. They're grouped by the kind of work: members and the mailing list, dues, letters, events, documents and committees, the wall and the forum, your public page, your plan, and your own account. Where Part 1 already gives the steps, the task here points to them and adds what Part 1 leaves out.
Every task in this part can be done by any admin. The last group, "Your own account," is for every member.
Members and mailing list
Everything in this group happens on pages under Admin in the menu. The Members page lists everyone in the Guilde, 20 at a time. Use Previous and Next at the bottom of the list to see the rest, or type a name in the search box to find someone at once.
Add a new member
Takes: about a minute. Have ready: the person's name and email address.
Part 1, task 6, covers the steps under "Add one member at a time." A few more things to know:
- Each person needs an email address of their own. The box takes only one person's address.
- Phone takes a US number only.
- Leave Send invite email to set up account checked unless you'd like to send the setup email later. If you uncheck it, the row shows Send invite, and you can send it from there whenever you're ready.
- If the email address already has a GuildeHall account, for example because the person belongs to another Guilde, GuildeHall sends them an invitation to accept instead of a setup email, whether or not the box is checked. They show as Invited until they accept, and until then you see only their name and email address.
- On Guilde Free, you can't add anyone once the Guilde has 150 members. The window shows Upgrade required, with a button to the plans on Settings. Members invited with an existing account don't count until they accept, and once the Guilde has 150 members they can't accept until it moves to Guilde Standard.
Remove a member
Takes: about a minute. Have ready: nothing.
- On the Members page, click ⋯ at the end of the member's row.
- Choose Remove from Guilde, and confirm.
On a phone, tap the member's card to open it, then tap Remove Member.
The member loses access to the Guilde at once. GuildeHall also takes them off the Leadership list and stops any automatic dues renewal, so they aren't charged again. The time they've already paid for runs to its end date. GuildeHall doesn't email them about the removal.
Their account stays, because it may belong to other Guildes too, and so do their posts and their dues records. To bring them back, add them again with Add Member. If they had set up their account, they'll get an invitation to accept. If they never did, they're back in the Guilde at once and, if you leave Send invite email checked, get a new setup email, as when you first added them.
GuildeHall won't remove the Guilde's only admin. Make someone else an admin first. If Stripe can't be reached to stop an automatic renewal, nothing is removed, and the message asks you to try again in a few minutes.
A member can also leave the Guilde on their own, from My Account, as "Leave a Guilde" explains. The same rules apply, and the Audit Log records that they left.
Resend an invitation
Takes: about a minute. Have ready: nothing.
Use this when someone says the email never arrived, or that its link has expired.
- On the Members page, find the person's row. Its Status column says Not set up or Invited, with the date the last email went out.
- Click Resend, or Send invite if no setup email has gone out yet, and confirm.
On a phone, tap the person's card to open it, then tap Resend Invite, Send Invite, or Resend Invitation.
A message confirms that the email has been sent. A Not set up row is someone you added who hasn't set up their account, and they get the setup email again. Its link works for seven days, and the link in an earlier email that hadn't yet expired works for those seven days too. An Invited row is someone who already had a GuildeHall account and hasn't accepted yet. They get the invitation again, titled "[your name] invited you to join [Guilde name]," with the same link as before.
Resend waits two minutes between emails to the same person. A second click straight away says "An email went to them a moment ago."
The Admin Dashboard also lists, under "Needs your attention," how many members haven't set up their accounts.
Correct a member's name or email address
Takes: about a minute. Have ready: the right spelling or address.
This works only for a row marked Not set up: someone you added who hasn't signed in yet. Once a person has set up their account, an officer can't change their name or email address, because the account is theirs and may belong to other Guildes too. They can correct their own name under My Account.
- On the Members page, click ⋯ at the end of the person's row.
- Choose Edit name and email.
- Correct the First Name, Last Name, or Email, and click Save.
On a phone, open their card and tap Edit Name and Email.
If you changed the email address, GuildeHall sends the setup email to the new address at once, and the link sent to the old address stops working. Nothing changes, and a message on the page says why, if the new address already belongs to another GuildeHall account, or if another Guilde also added this person. In either case remove the row and add the person again with the right address.
Reset a member's password
Takes: a minute. Have ready: nothing.
For a member who has set up an account but forgotten the password. A member can also do this themselves, from the sign-in page.
- On the Members page, click ⋯ at the end of the member's row.
- Choose Reset password, and confirm.
On a phone, open their card and tap Trigger Password Reset. GuildeHall emails the member a link to choose a new password, which works for one hour.
Sort members into groups with tags
Takes: about five minutes to set up, then a minute for each member. Have ready: nothing.
A tag is a label you put on members, such as "Block captain" or "Garden committee." You can show only the members with a tag, and send a letter to everyone who carries one. Members don't see tags in the app, though a member's own data download lists the tags they carry.
Create a tag
- On the Members page, click Manage tags.
- Type the tag's name in New tag name, and click Add.
- Repeat for each tag, then close the window with the × in its corner.
In the same window, Rename changes a tag's name, and Delete removes it from every member after you confirm. A letter already sent to a tag keeps its record.
Give a member tags
- On the Members page, click ⋯ on the member's row and choose Edit tags.
- Check each tag that applies, and click Save.
The member's tags now appear under their email address in the list. Tags are given one member at a time.
Show only the members with a tag
Choose the tag in the dropdown beside the search box. It starts at All tags. The number beside each tag is how many people the list shows when you choose it, including those who haven't set up their accounts.
Download the member list
Takes: about a minute. Have ready: nothing.
- On the Members page, click Export CSV. A file named members_export.csv downloads to your computer.
- Open it in Excel or Numbers by double-clicking it. In Google Sheets, choose File, then Import, then Upload, and choose the file.
The file always holds the whole Guilde, whatever the search box or tag dropdown shows: every member and officer, including those who haven't set up their accounts. People invited with an existing account who haven't accepted yet aren't in it.
The columns are first_name, last_name, email, username, phone, address_line1, address_line2, city, state, zip_code, date_of_birth, role, membership_tier, membership_status, and gets_letters. The gets_letters column says yes or no: no means the member asked not to receive the Guilde's letters, or their address can't receive mail. Leave the no rows out whenever you email members from your own account. The file has no tags and no join dates.
Keep a mailing list of people who aren't members
Takes: about a minute for each address. Have ready: nothing.
The Contacts page holds email addresses of people who want to hear from the Guilde without joining, such as neighbors or prospective members. A contact has no account, doesn't appear in the roster, and doesn't count toward the 150-member limit on Guilde Free. Storing contacts is free on every plan, but only Guilde Standard sends them letters. On Guilde Free, letters go to members only.
Add a contact
- In the menu, click Contacts, then Add contact.
- Fill in Email, and Name and Note if you like.
- Click Add contact.
The contact is added as Subscribed. GuildeHall doesn't email them when you add them.
GuildeHall refuses an address that unsubscribed from the Guilde's mailings, with a message saying that only the person can sign up again. An officer can't override it.
Change or remove a contact
Click the contact's row to open it. You can change the Name and Note and click Save. To change an email address, remove the contact and add it again. Remove deletes the contact after you confirm.
Removing a contact who unsubscribed also deletes the record of their choice. If the address is later imported again, they would start receiving mail. Keep unsubscribed contacts on the list.
What the statuses mean
- Subscribed contacts receive letters sent to contacts.
- Pending confirm contacts signed up on your public page and haven't clicked the link in their confirmation email yet. They receive nothing until they do, and an officer can't confirm for them.
- Unsubscribed contacts are never emailed. Only they can sign up again, through the form on your public page.
The dropdown that starts at All contacts narrows the list to Subscribed, Unsubscribed, or Pending, and the search box finds a contact by email address or name.
How people sign themselves up
A public Guilde's page has a Get updates by email card. A visitor enters their email address, and their name if they like, and clicks Subscribe. GuildeHall emails them a confirmation link, and they're added as Pending confirm until they confirm. Private and secret Guildes don't have this form, and neither does a Guilde on Guilde Free, whose letters don't reach contacts.
Every letter to a contact carries an unsubscribe link at its foot. A contact who uses it shows as Unsubscribed.
Download the contacts
Click Export on the Contacts page. A file named contacts_export.csv downloads, with every contact and their status.
Move your mailing list over from Mailchimp
Takes: about twenty minutes. Have ready: your Mailchimp login.
Mailchimp exports a separate file for each kind of contact. Import the subscribed contacts as subscribers, and the unsubscribed and cleaned contacts as an unsubscribe list, so that nobody who left your old list, and no address that bounced, starts receiving mail again.
- In Mailchimp, click Audience. If you have more than one audience, choose the one to move from the Audience menu.
- Click Export audience, then Export CSV. Mailchimp emails you when the export is ready.
- Download the export. It's a ZIP file holding a CSV file for each kind of contact, with the kind in the file's name: subscribed, unsubscribed, non-subscribed, and cleaned. Open it to unpack the files. An audience with only one kind of contact exports as a single CSV file.
- In GuildeHall, on the Contacts page, click Import CSV.
- Under What is this file?, leave Subscribers — people who want your mailings chosen. Under CSV File, choose the subscribed file, and click Upload & Import.
- Read the result. It says how many were imported and how many were already on the list, and it lists any rows it rejected, with the reason.
- Click Import CSV again. This time choose An unsubscribe list (from Mailchimp or another service), choose the unsubscribed file, and click Upload & Import. Do the same with the cleaned file, which holds addresses Mailchimp stopped sending to because mail to them bounced.
- Close the window.
Leave out the non-subscribed file. It holds people who never signed up for mail, such as buyers from an online store.
Mailchimp's column names work as they are. A file can hold up to 2,000 rows. If yours is longer, split it and import each part. Contacts imported as subscribers are added as Subscribed, without a confirmation email.
The Switching from Mailchimp? panel at the bottom of the Contacts page repeats these steps. Click Show to open it.
Put a signup form on your own website
The same panel holds a ready-made signup form for your Guilde's own website. Open the panel with Show, click Copy form HTML, and give the copied text to whoever manages the website, to paste into a page. People who sign up through it get the same confirmation email as on your public page. The form works only while your Guilde is on Guilde Standard or Premium. On Guilde Free, people who use it see a "page not found" message. If the Guilde Details card on Settings has a Website, the form sends people back to that website after they sign up. A form copied before the website was added doesn't do this, so copy the form again after adding it. Whoever manages the website can change the address after return in the form to the page the form is on, as long as it's on the same site. Without a website on file, people land on your Guilde's public page on GuildeHall, which tells them to check their email.
The form works only while the Guilde is public. The panel warns you if it isn't.
Answer people who write through your public page
Takes: a few minutes for each message. Have ready: nothing.
A public Guilde's page has a Get in touch form, and a private Guilde's page has a Request to join form. When someone sends one, every admin who has set up their account gets an email titled "New inquiry from [name] — [Guilde name]," and the Admin Dashboard lists it under "Needs your attention." A dot appears beside Admin Dashboard in the menu while one is waiting.
- On the Admin Dashboard, click the line about new messages from your public page, or All inquiries at the bottom of the "Needs your attention" card. The Inquiries page opens, showing open messages.
- Read the message, and decide whether to answer it or to bring the person into the Guilde.
- To answer, click Reply by email. Your own email program opens a reply addressed to the sender. Then record what you did: click ⋯ and choose Mark as contacted, Mark as joined (no invite sent), or Dismiss.
- To bring the person into the Guilde, click Add as member, and confirm. GuildeHall adds them, emails them a setup link, or an invitation if they already have an account, and marks the message Joined.
Replying doesn't change the message's status on its own, so mark it yourself, or the next officer may answer it again.
Add as member takes the first word of the name they typed as the first name and the rest as the last name. If they typed only one name, their last name reads "(from inquiry)." Ask them to correct it on their My Account page once they've signed in.
The chips at the top of the page show All, Open, New, Contacted, Joined, or Dismissed messages. Reopen, under ⋯, brings back one that was marked joined or dismissed. Each list shows the 50 most recent messages.
Let people join with a link
Takes: about five minutes. Have ready: nothing.
An invite link lets anyone who has it join the Guilde without an officer adding them. Hand it out at a meeting or print it in a newsletter. For a private Guilde, the link is the approval, so share it only with people you'd approve. For a secret Guilde, the person also confirms who they are with a code before joining.
Make a link
- In the menu, click Settings. In the Invite Links card, click Create invite link.
- If you like, type a Label so you'll know the link later, such as "October newsletter."
- If the link should stop working on a date, set Expires. If it should stop after a number of people have used it, set Max uses. Leave both blank for a link that works until you revoke it.
- Leave Role on join as Member. Admin makes everyone who uses the link an admin, so choose it only for a link you send to officers.
- Click Create link.
- Click Copy URL beside the new link, and paste it wherever you're sharing it.
Each link shows how many times it has been used. To stop a link, click Revoke and confirm. A revoked link can't be turned back on, so make a new one if you need it again.
What the person sees
The link opens a page naming the Guilde and who invited them. If they aren't signed in, they click Sign in to accept, or Create one to make an account. Then they click Accept and join [Guilde name], and they're a member at once.
For a secret Guilde, they also enter a six-digit code before joining, either from their authenticator app or from an email GuildeHall sends them.
GuildeHall doesn't notify admins when someone joins by link. They appear on the Members page. On Guilde Free, a link stops working for new people once the Guilde has 150 members.
A person who joined through a link and was later removed can't use the same link again. Send them a new one, or add them on the Members page.
Hand the Guilde over to next year's officers
Takes: about half an hour, with the incoming officers. Have ready: each incoming officer's name and email address, and whoever holds the Guilde's Stripe login.
- Make the incoming officers admins. Follow "Make each officer an admin" in Part 1, task 3. Do this first, so the Guilde always has an admin.
- Take the outgoing officers off the Leadership list. On Settings, in the Leadership card, click Remove beside each one, and confirm.
- Add the incoming officers. In the same card, under Add someone, add each one with their title, as in Part 1, task 3. Use the arrows to put the list in order. Change title only rewords a title.
- Remove the outgoing officers' admin access. On the Members page, click ⋯ on each outgoing officer's row, choose Remove admin role, and confirm. They stay members.
- Hand over the Stripe account, as described in the next section, if the Guilde takes dues online.
- Step down yourself. On Settings, in the Danger Zone card at the bottom, click Step down as admin, and confirm. You stay a member, and GuildeHall takes you to the home page.
Step down as admin appears only when the Guilde has another admin, so the Guilde is never left without one. Stepping down doesn't take you off the Leadership list, so include yourself in step 2.
Hand over the Stripe account
GuildeHall doesn't control who can sign in to the Guilde's Stripe account. The person who set it up in Part 1, task 4, is its owner, and only the owner can hand it to someone else. Stripe calls the people with logins its team.
- The owner signs in to the Stripe Dashboard and goes to dashboard.stripe.com/settings/team.
- The owner clicks Add member, types the incoming treasurer's email address, chooses the Super Administrator role, and clicks Send invites.
- The incoming treasurer opens Stripe's invitation email and accepts it within 10 days, creating a Stripe login if they don't have one.
- On the same Team page, the owner clicks ⋯ beside the incoming treasurer, chooses Transfer ownership, and follows Stripe's prompts.
- The new owner then removes the outgoing treasurer from the Team page, or keeps them on if the Guilde wants that.
To give another officer a login without making them the owner, follow steps 1 and 2 and choose the Administrator role. An Administrator can refund payments and see payouts, but can't change the owner or the bank account.
If the owner can't be reached, the Guilde can't hand the account over itself. Write to Stripe Support, at support.stripe.com.
A Guilde's plan, if it pays for one, is billed to a card on file. To change the card, an admin clicks Manage billing in the Guilde Plan card on Settings. See "Change your billing or card."
The Danger Zone also holds Delete Guilde, which deletes the Guilde and everything in it, so read the button before you click.
Dues and money
Most of this work happens on the Dues page, under Admin in the menu. GuildeHall has no separate treasurer role, so the treasurer needs to be an admin (Part 1, task 3).
The Dues page has up to five cards, from top to bottom: Collecting dues online, Where things stand, Payments, Membership tiers, and, once members can pay online, Join link.
On Guilde Free, everything here works except collecting dues online. You can add tiers, record checks and cash, download payments, and see who has paid.
Record a check or cash payment
Takes: about a minute for each payment. Have ready: who paid, how much, and on what date, and the check number if there is one.
The steps are in Part 1, task 4, under "Record the checks and cash that still arrive." A few more things to know:
- The Date paid can be any past date, but not a future one.
- A payment made early isn't lost. If the member is still paid up, the new term starts when the current one ends.
- For a household or business tier, the member who paid adds the other people it covers, from their own Membership page. Officers can't add them. "What members see when they pay," below, explains how.
- The Members page doesn't offer Record dues payment on a phone, or on rows marked Invited. Use the Dues page instead, where you can find anyone by name.
- Email [first name] a receipt starts out checked. The receipt is titled "Receipt for your dues - [Guilde name]." If the Public email on Settings is filled in, a reply to it goes there. For a complimentary membership it's titled "Your membership - [Guilde name]" and shows no amount or date paid. The note you typed isn't included. GuildeHall sends the receipt even to a member who has turned off letters, since it's a record of their own payment. If it can't be sent, a second message says so, and the payment is still recorded. Correcting or deleting a payment sends nothing.
- GuildeHall sends reminders before the membership ends, to members who paid by check or cash as well as online.
Correct a payment you recorded
- On the Dues page, in the Payments card, find the payment and click Correct beside it.
- Change Paid by, Amount, or Note, and click Save.
To fix the member, the tier, or the date, click Delete payment in the same window and confirm, then record the payment again. Deleting a payment also takes back the membership time it added. Only payments recorded by hand have Correct. Online payments are changed in Stripe, as "Give a refund" explains.
See who has paid and whose membership has lapsed
Takes: a minute or two. Have ready: nothing.
Lapsed dues never lock anyone out. A member whose dues have lapsed signs in, posts, and appears in the roster as before. Lapsing changes only how they're labeled and which letters they can be sent.
On the Dues page, the Where things stand card shows four figures:
- Paid up: members whose membership hasn't ended, including people covered by someone else's household or business membership. Officers count as members.
- Renewing automatically: members whose membership will renew and be charged on its end date.
- Ending in the next 60 days, which includes members who will renew automatically.
- Lapsed: members who have paid before and whose membership has ended.
The line below the figures gives the dues collected since January 1, before Stripe's fee.
Click any of the four figures to open the Members page showing the people it counts. On the Members page itself, the dues list beside the search box does the same: choose Paid up, Renewing automatically, Ending in 60 days, Lapsed, or No dues on record, and choose All dues to see everyone again. The list appears once your Guilde takes dues, and counts the same people as the figures, so members who haven't accepted an invitation are left out.
Once your Guilde takes dues, the member list also has a Tier column, which shows one of these for each member:
- The tier and "Through [date]," for a member who is paid up.
- "Ends [date]," for a membership ending within 60 days.
- "Renews [date]," for a membership that will renew automatically.
- "With [household name]," for someone covered by another member's household or business membership.
- "Lapsed [date]," for a membership that has ended.
- "None," for someone who has never paid.
Clicking the Tier heading sorts the list by it, but only the 20 members on the page you're looking at. To write to everyone whose dues are ending or have lapsed, send them a letter, as described in "Send a letter to part of the Guilde." On a phone, the member list shows the tier only for members who are paid up, without dates.
Every member can see the Roster, and once your Guilde takes dues, the roster shows each member's tier. Members who aren't paid up, and members covered by a household, show a dash there.
Change a tier's price
Takes: about two minutes. Have ready: nothing.
- On the Dues page, in the Membership tiers card, click Edit beside the tier.
- Change the Price.
- Click Save.
The message that appears says how many members on automatic renewal will pay the new price at their next renewal. Everyone else pays the new price the next time they pay.
Changing the Length applies to payments from then on. Members already on automatic renewal keep the length and price they signed up for, so nobody is charged more often than they agreed to, and the message says how many. A member who wants the new length can stop automatic renewal on their Membership page and, once their term ends, pay again with automatic renewal on.
GuildeHall doesn't email members about a price change, though the reminder it sends 30 days before an automatic renewal quotes the amount that will be charged. Tell members yourself, in a letter, before the change takes effect.
If you rename a tier, the Roster shows its members under the new name, and its tier filter finds them. Their payment records, and the Dues and Members pages, keep the old name until they pay again.
Stop offering a tier
- Click Edit beside the tier.
- Click Remove tier, and confirm.
If anyone has ever paid for the tier, or started to, GuildeHall retires it instead of deleting it. It stays in the list marked Not offered, past payments keep its name, and members can no longer choose it. To offer it again, click Edit, check Offer this tier to members, and click Save.
Members already renewing automatically on a retired tier keep renewing on it. To stop one, ask the member to click Stop renewing automatically on their Membership page, or cancel the renewal yourself in the Stripe Dashboard, as "Stop a member's automatic renewal" under "Give a refund" explains.
Give a refund
Takes: about five minutes. Have ready: for an online payment, the Guilde's Stripe login. If you don't have it, hand this task to whoever does, usually the treasurer.
GuildeHall has no refund button.
A check or cash payment
Return the money by hand. Then delete the payment in GuildeHall, as "Correct a payment you recorded" explains, so the member no longer shows as paid for that time.
An online payment
Online payments are refunded in the Stripe Dashboard, which only someone with a login to the Guilde's Stripe account can open.
- On the Dues page, in the Collecting dues online card, click Open your Stripe Dashboard ↗. Stripe opens in a new tab.
- Sign in with the Guilde's Stripe login.
- In the sidebar on the left, click Transactions to see the list of payments. The Payments menu holds other things and doesn't list them.
- Find the payment, click ⋯ at the right of its row, and choose Refund payment.
- Leave the amount as it is for a full refund, or type a smaller amount for a partial one.
- Choose a reason. If you choose Other, Stripe asks for a note explaining it.
- Click Refund.
Stripe keeps its own fee on a refunded payment, so refunding a $1 payment costs the Guilde about 33¢. If the Guilde has no balance in Stripe at the time, the balance can dip slightly below zero.
When Stripe reports the refund, GuildeHall marks the payment Refunded, in the Payments list and on the member's own Membership page. A full refund also takes back the membership time the payment bought and drops it from the year's total. A partial refund leaves the membership as it was.
A full refund also turns off the member's automatic renewal, so they aren't charged again. After a partial refund, automatic renewal stays on. To stop it, ask the member to click Stop renewing automatically on their Membership page, or do it yourself in Stripe.
Stop a member's automatic renewal
- In the Stripe Dashboard, type the member's email address in the search box at the top, and open their subscription.
- Click ⋯, and choose Cancel subscription.
- Choose to end it at the end of the current period, and to give no refund.
- Click Cancel subscription.
The member's membership runs to its end date and doesn't renew, and GuildeHall shows it that way shortly after. Ending it immediately instead stops the renewal too, but doesn't shorten the time already paid for in GuildeHall.
GuildeHall doesn't email the member about a refund.
If a member disputes a payment
A member can ask their bank to reverse a card payment. When that happens, every admin who has set up their account gets an email titled "A dues payment was disputed - [Guilde name]," and the payment shows Disputed in the Payments list. Stripe holds the amount while the bank decides. The email's Open the Stripe Dashboard button takes you to where you can respond.
The Disputed label stays in GuildeHall whatever the bank decides.
Find payouts and payments in Stripe
Takes: a few minutes. Have ready: the Guilde's Stripe login.
Stripe keeps the full record of online payments: each payment, Stripe's fee, each refund, and each payout to the Guilde's bank account. GuildeHall records who paid, how much, and for which membership, but not fees or payouts.
- On the Dues page, in the Collecting dues online card, click Open your Stripe Dashboard ↗. The button appears once dues are on.
- Sign in with the Stripe login created during setup in Part 1, task 4.
- Click Transactions in the sidebar on the left for the list of payments. The Payments menu holds other things, such as disputes, and doesn't list them.
- For payouts, click Balances in the sidebar, then Payouts. Click a payout to see the payments, refunds, and fees it included.
Each officer who needs Stripe should have their own login, not a shared one. "Hand over the Stripe account," under "Hand the Guilde over to next year's officers," explains how the owner adds one.
The first time you open the Dashboard, Stripe asks you to verify your email address and shows a "Get started" panel meant for software developers. Verify the email and ignore the panel.
Download payments for the treasurer or accountant
Takes: about a minute. Have ready: nothing.
- On the Dues page, in the Payments card, click Export CSV. A file named dues_payments.csv downloads to your computer.
- Open it in Excel or Numbers by double-clicking it. In Google Sheets, choose File, then Import, then Upload, and choose the file.
The file lists every payment the Guilde has ever received through GuildeHall, online and recorded, oldest first. It always includes all of them, whatever the list on the page is set to show. For one year's payments, sort by the date column and delete the rows outside that year.
The columns are date, member, email, tier, amount, method, status, term_start, term_end, recorded_by, and note. Amounts are before Stripe's fee. A payment marked refunded may have been refunded only in part. A card payment made late in the evening may show the next day's date. Stripe's fees and payouts aren't in this file, and come from the Stripe Dashboard.
What members see when they pay
Members pay from Membership in their menu. It appears once the Guilde offers at least one tier and either takes dues online or has recorded a payment.
The page opens with where the member stands, for example "You're a Household member through Jun 30, 2027." Below that, the member:
- Chooses a tier.
- For a household or business tier, types the Household name or Business name.
- Leaves Renew automatically every [length] checked, or unchecks it. It starts out checked, so a member who doesn't want automatic renewal has to uncheck it. The box appears only for tiers that offer automatic renewal.
- Clicks Pay $[price] → and pays on Stripe's secure page.
A member who is still paid up and keeps automatic renewal checked sees Turn on automatic renewal → instead of a price, and pays nothing until their current membership ends.
Back on the Membership page, a message says "Thank you. Stripe is confirming your payment," and a moment later "Thank you. Your dues are paid." GuildeHall emails a thank-you titled "Thank you for your dues - [Guilde name]." A member who pays early has the new term added to the end of the current one. A payment from a bank account takes several days to clear and appears only then.
A member on automatic renewal sees two more buttons. Stop renewing automatically lets the membership run to its end date without renewing. Update card ↗ opens a Stripe page where they can change the card on file.
For a household or business tier, the member who paid sees a card listing the people it covers. They add each person with First name, Last name, and Email, and click Add a person. The person who paid counts toward the tier's limit. Each person added gets a setup email, or an invitation if they already have a GuildeHall account.
If the Guilde doesn't take dues online, the page lists the tiers and says "[Guilde name] isn't taking dues online yet. Pay your treasurer by cash or check, and they'll record it."
Reminders
GuildeHall emails each member before their membership ends, whether they paid online, by check, or in cash:
- 30 days before: "Time to renew - [Guilde name]."
- 7 days before: "Your membership ends soon - [Guilde name]."
- For a membership that renews automatically, one email 30 days before: "Your membership renews on [date] - [Guilde name]," with the amount to be charged.
If your Guilde takes dues online, the first two emails have a Renew your membership button and also mention paying the treasurer by cash or check. If it doesn't, they ask the member to pay the treasurer by cash or check.
If an automatic renewal or a bank payment fails, the member gets "Dues payment didn't go through - [Guilde name]."
People who aren't members yet
A public Guilde that takes dues online also lets new people join and pay in one step. Its public page shows a Become a member card and a Join button. The visitor chooses a membership, enters their name and email, clicks Continue to payment →, and pays. GuildeHall then emails them a link to set up their account. A new person becomes a member as soon as they've paid, with no approval step. Someone who already has a GuildeHall account gets an invitation instead, and becomes a member once they accept it.
The Join link card on the Dues page gives the address of that form, with a Copy button, so you can share it or put it in a letter as a button. A private or secret Guilde doesn't have this form: new people join by invitation, then pay from their Membership page.
Letters and messages
A letter is an email from your Guilde to its members, its mailing-list contacts, or both. It's what a newsletter service such as Mailchimp sends. Letters are written on the Communications page, under Admin in the menu.
Every plan sends letters. On Guilde Free, a letter goes to all of your members in GuildeHall's standard look, and ends with a line saying it was sent with GuildeHall Network. Guilde Standard adds your mailing list, letters to part of the Guilde, photos and a header image, your own masthead and color, scheduling, and showing letters on your public page. On Guilde Free, the editor explains this at the top.
Each calendar month, Guilde Free can send up to 1,000 letter emails, Guilde Standard up to 10,000, and Guilde Premium up to 30,000. A letter to 400 people counts as 400. Test letters don't count, and the count starts again on the 1st. Under the To box, the editor shows how many your Guilde has used this month, and it warns you before you send a letter that would go past the limit. Such a letter isn't sent. A Guilde of 500 members sending a letter every week uses about 2,200 a month, so few Guildes come near the limit. If yours needs more, see "Getting help" in Part 3.
The Communications page shows your four most recent letters. All letters → opens the full list, where each letter shows its status: Draft, Scheduled, Sending, or Sent. Click a letter to open it.
Write and send a letter
Takes: about half an hour for a newsletter, or five minutes for a short notice. Have ready: nothing.
Part 1, task 7, covers a plain letter. This task covers everything else the editor does.
Write it
- On Communications, click Write a letter.
- In To, choose who receives it. "Send a letter to part of the Guilde," below, explains each choice. The line under the box shows how many people it will reach.
- Type a Subject.
- Write the letter in the Letter box.
GuildeHall saves the draft a few seconds after you stop typing, and the time of the last save appears beside Discard draft at the bottom. Save draft saves it at once. On a wide screen, the right side shows the letter as it will arrive. On a smaller screen, use the Write and Preview tabs.
Format it
The buttons above the Letter box format the text. Point to any button to see its name.
- Bold and Italic: select words first, then click the button. Click it again to remove the formatting.
- Section heading and Sub-heading: click in a line, then click the button to make that line a heading.
- Bulleted list and Numbered list: click in a line, or select several, and click the button.
- Quote: sets a passage off with a line beside it, for a quotation or a message from the president.
- Divider: draws a line across the letter between sections.
Clicking a heading, list, or quote button a second time turns the line back into ordinary text.
Add a link or a button
- Select the words readers should click, and click Link.
- Make sure Link text shows the words you want, type or paste the Web address, and click Add link.
To change a link, click in it and click Change link. Change the address and click Save, or click Remove link.
A button is a link drawn as a large colored button on a line of its own, for the one thing you most want readers to do, such as "Get tickets" or "Pay your dues." Click Button, fill in Button text and Web address, and click Add button. To change or remove it later, click the button in the letter.
Add photos
Photos and header images are part of Guilde Standard. On Guilde Free, the Photo button and + Header image don't appear.
- Click in the line the photo should follow, and click Photo.
- Choose the picture on your computer. It must be a JPEG, PNG, or WebP file of 10MB or less. If a photo is refused, it may be in the HEIC format iPhones use. Save a copy as JPEG and choose that instead.
- Under the photo, type a caption in Add a caption (optional) if you like.
- Choose its width: Full, ⅔, or ½. Narrower photos are centered.
A letter holds up to 12 photos. Remove photo takes a photo out of the letter, but it still counts toward the 12, so that a letter already sent never loses a picture it showed. A letter where you've tried many photos may reach the limit early. The line beside Photo counts the uploads used. If you reach 12, start a new letter and copy the text across from the old one.
Add a header image
Click + Header image to put a picture across the top of the letter, above the greeting, such as the Guilde's name or a photo of the neighborhood. Replace header image and Remove image change it. If your Guilde has a standing masthead (see "Give your letters a masthead and a color"), every new letter starts with it.
Include posts and events
Click + Posts or + Events to add recent wall posts or upcoming events. They appear after the letter under "From our notice board" and "Coming up," each with a link to read more. Check up to 10 of each, and click Done. In a public Guilde, only posts and events shown on the public page can be added, because a letter can go to people who aren't members. A private or secret Guilde has no public page, so any of its posts and events can be added. Events that have ended by the time the letter goes out are left out.
Check it and send it
The editor warns you if the Guilde has no mailing address. The law on bulk email requires one at the foot of every letter, so add it under Settings, in Guilde Details. It also warns you past 35,000 characters, because mail programs cut off very long letters.
When the letter is ready, send yourself a test first (see the next task). Then:
- Click Send. A window shows who the letter is going to and how many people that is.
- Click Send now.
GuildeHall opens the letter's own page, which shows Sending and then Sent. A sent letter can't be recalled, changed, or deleted.
What readers receive
The letter comes from your Guilde's name. Replies go to the Public email on Settings, so if that's blank, readers can't reply. Members' copies open with "Hi" and their first name.
At the foot are the Guilde's address, links to its website and Facebook page if they're filled in, and three links: Unsubscribe, Email preferences (members only), and View in browser.
Discard a draft
Click Discard draft at the bottom of the editor, then Discard draft again to confirm. Before a new letter is first saved, the button reads Cancel and leaves without keeping anything. A scheduled letter has no Discard draft button. Click Unschedule first.
Send yourself a test first
Takes: a few minutes. Have ready: nothing.
- In the letter editor, click Send test to me.
- Open the email in your own inbox. Its subject begins "[Test]."
- Check the greeting, every link, the photos, and the address at the foot, and correct anything in the editor.
The test goes only to your own email address. It's exactly what a member receives, with two things to know about:
- Unsubscribe in a test changes nothing. It opens a page saying this was a test letter. In the letter members receive, the same link takes the reader off your Guilde's letters.
- View in browser in a test says the letter wasn't found. It works once the letter has been sent.
Schedule a letter for later
Takes: a minute. Have ready: nothing.
Scheduling is part of Guilde Standard. On Guilde Free, Schedule… doesn't appear.
- In the letter editor, click Schedule….
- In Send at, choose the date and time, in your computer's time zone.
- Click Schedule.
The top of the editor then shows Scheduled with the time it will go. You can keep editing until then, and your changes are saved. The letter goes out within a minute of the time you chose. GuildeHall works out who receives it at that moment, so members who join or unsubscribe in the meantime are counted correctly.
To change the time, click Unschedule at the top of the editor, then Schedule… again. To send a scheduled letter at once, click Send now, then Send now again in the window.
If the letter can't go out at its time, for example because nobody is left to receive it, the tag it was addressed to was deleted, it would go past the Guilde's monthly limit, or the Guilde is no longer on Guilde Standard, it goes back to being a draft, and the officer who wrote it gets a notice under the bell explaining why.
Send a letter to part of the Guilde
Takes: a minute, once any tags you need exist. Have ready: nothing.
These choices are part of Guilde Standard. On Guilde Free, To offers only All members.
In the letter editor, choose the readers in To:
- Everyone — members and contacts: every member, plus everyone on the mailing list.
- Members only.
- Contacts only: everyone on the mailing list who isn't a member.
- Members with a tag…: then choose the tag in the box that appears. "Sort members into groups with tags" explains tags.
- Members with dues expiring soon (60 days): members whose membership ends in the next 60 days and won't renew automatically.
- Members with lapsed dues: members who have paid before and whose membership has ended.
- People attending an event…: then choose the event. It reaches members who said they're going or took a ticket. Guests who took tickets without an account aren't included.
The line under To shows how many members and contacts the letter will reach, and how many it leaves out because they opted out of letters or their address can't receive mail. Every member who has opted out is left out, whatever you choose.
To write to an event's attendees from the event itself, open the event and click Email attendees. The button appears only on Guilde Standard and Premium. A new letter opens with the event already chosen.
Give your letters a masthead and a color
Takes: about ten minutes. Have ready: an image for the top of your letters, if you have one: the Guilde's name or seal, or a photo, about 1200 pixels wide and 400 tall.
These settings are part of Guilde Standard. They're on Communications, in the Letter identity card, which on Guilde Free shows a note in their place. They apply only to your Guilde's letters. Sign-in and password emails use GuildeHall's own look.
Add a masthead
- In Standing masthead, click + Add a masthead.
- Choose the image. It must be a JPEG, PNG, or WebP file of 10MB or less.
A message says new letters will carry it. Each new letter starts with the masthead as its header image, which you can change for that one letter. Letters already written, sent or not, keep the header they had. Replace masthead and Remove change it for future letters.
Choose a color
- In Letter color, click one of the six colors, or type a color code such as #1F5C3D.
- Click Save color.
The color is used for headings, links, and buttons. GuildeHall refuses a color too light to read on white. If your Guilde takes dues online, its payment page uses the same color.
The links to your website and Facebook page at the foot of every letter come from Settings, in Guilde Details.
Start this month's letter from last month's
Takes: a minute. Have ready: nothing.
Only a letter that has gone out, or is going out, has Duplicate. A draft doesn't.
- On Communications, click All letters →, and open last month's letter.
- Click Duplicate, at the top right.
A message says "Copied to a new draft," and the copy opens in the editor. It keeps the subject, the text, the readers, the photos still in the letter, the header image, and the posts and events. Photos removed from the original don't come across, so only the photos still in the letter count toward the copy's 12. Change the subject, which is copied exactly, and everything that's out of date. The copy and the original are separate from then on.
See who your letter reached
Takes: a minute. Have ready: nothing.
Open the letter from Communications or All letters →. The Delivery card shows:
- Recipients: how many people it was sent to.
- Accepted: copies GuildeHall handed to its email service to deliver.
- Delivered: copies that reached the reader's email provider, such as Gmail.
- Bounced and Failed: copies that didn't arrive.
- Unsubscribed: members who used this letter's Unsubscribe link.
- Opted out (skipped) and Undeliverable (skipped): people left out before sending, because they'd opted out of letters, or their address had bounced or been reported as spam before.
The figures update while the letter is sending. Deliveries can keep arriving for some time after it reads Sent, so reload the page later for the final count.
GuildeHall doesn't record who opens a letter or clicks its links, so there's no count of who read it.
Click Show delivery problems to see the addresses that bounced or failed. An address that bounces permanently, because it doesn't exist, is marked Undeliverable on the Members or Contacts page, and future letters skip it.
To see every address the letter went to, click Show all [number] recipients in the Recipients card. Each address shows whether it belonged to a member or a contact, and its status: Delivered, Sent (handed over, with no report from the reader's provider yet), Bounced, Failed, Reported as spam, or Not sent yet while the letter is still going out. Type part of an address in the search box to find it, or narrow the list by status, or to members or contacts only. The list shows 50 addresses at a time, with page numbers below.
View in browser ↗ opens the letter as a web page, and The letter as sent card shows it as readers received it.
Put a letter on your public page
Takes: a minute. Have ready: nothing.
A public Guilde can show its letters on its public page, as an archive anyone can read.
- Open a sent letter.
- In the Delivery card, check Show on our public page.
The letter now appears under "Recent letters" on your public page, which lists the five most recent you've chosen. Search engines can find it too. The public copy leaves out the greeting and the unsubscribe links. Uncheck the box to take it down.
The box is off for every letter until you check it. It's part of Guilde Standard, and private and secret Guildes can't use it.
Post a notice members see when they sign in
Takes: a few minutes. Have ready: nothing.
A mass message reaches members inside GuildeHall, in Messages and under the bell, with no email. Use it for a notice members will see the next time they sign in, such as a change of room. For anything that must reach people today, send a letter instead, with only a subject and a sentence or two.
- On Communications, find the Mass Message card.
- In Send to, leave Everyone with an account, or choose a tag.
- Type the Message, up to 1,000 characters.
- Click Send to Members, and confirm.
The line below the card says how many members it reached. It goes to every member who has set up an account, apart from you, since no one else can sign in to read it. To reach members who haven't set up their accounts, send a letter. A mass message appears as a message from the Guilde. A member who replies writes to you. Mass messages are free on every plan.
When a member says letters have stopped
Takes: a few minutes. Have ready: the member's name.
Most often, the member clicked Unsubscribe in a letter, which stops that Guilde's letters to them, or turned off letters on their My Account page. Only the member can turn letters back on. To see who has opted out, download the member list: the gets_letters column says no for each one (see "Download the member list").
To turn them back on, the member follows "Stop one Guilde's letters but not another's," under "Choose which emails you get." If the member's row on the Members page shows Undeliverable, their address bounced, and letters will skip it until it's fixed. See "Getting help" in Part 3.
Events
Events live under Events in the menu. Every member sees the calendar and can say whether they're going. Only admins create, change, and cancel events. Events and free tickets work on every plan, including Guilde Free.
The Events page has two views, List and Calendar. The list shows Upcoming or Past events, and the box beside them shows one type of event at a time. A repeating meeting appears in the upcoming list once, at its next date. The calendar shows every date.
Create an event
Takes: about five minutes. Have ready: the date, time, and place, and a sentence or two about the event.
Part 1, task 5, covers the basic steps. The form has more:
- Event type is one of Meeting, Lecture, Cleanup, Tour, Social, Fundraiser, or Other.
- End must be after Start.
- Video call link is for members joining online. Only signed-in members see it, never the public page.
- Show on the public Guilde page puts the event on your public page. Only a public Guilde has this box. "Show an event on your public page and on GuildeHall's events directory," below, explains what that does.
- Email every member about this event is checked to start with. Uncheck it for an event members don't need to hear about by email, and always for a test. Members get a notice in GuildeHall either way.
- Held since and This year's number are for a yearly tradition, such as "Held since 1952" or "the 41st annual." They appear only on GuildeHall's events directory, so fill them in only if you know them.
- Free ticketing lets people register for tickets. "Take free tickets for an event" explains it.
- Volunteer roles lists jobs members can sign up for. "Ask for volunteers" explains them.
If you administer more than one Guilde, the form first asks Which Guilde is this event for?
After you click Create event, the event appears in the list. No message confirms it.
Add a cover image
A cover image runs across the top of the event's page in GuildeHall and on its public page.
- Open the event and click Add cover image.
- Choose a JPEG, PNG, or WebP picture of 10MB or less. A wide picture works best, because the pages show it twice as wide as it is tall.
Replace cover image changes it later, and Remove cover takes it off after you confirm. Each date of a repeating meeting has its own cover, so adding one to the first date doesn't add it to the others.
Set up a meeting that repeats
Takes: about five minutes. Have ready: nothing.
- In the Create event form, set the Start and End of the first meeting first, because the choices in Repeats are worded from that date.
- In Repeats, choose Weekly, Monthly on day [N], or Monthly on the [1st] [Tuesday].
- In the box that appears beside it, choose how often: every week or month, or every 2, 3, 4, 6, or 12.
- Set Until to the last date you want on the calendar.
- Fill in the rest of the form, and click Create event.
GuildeHall creates every date at once, up to two years ahead or 100 dates, whichever comes first. Dates past that limit aren't created, and no warning says so. Meetings stay at the same time of day through the change to and from daylight saving time.
A meeting set for day 29, 30, or 31 skips any month without that day. A meeting set for the 5th week of the month skips months without one. Each date keeps its own list of who's going and its own volunteer sign-ups.
The pattern and the Until date can't be changed afterward. To change them, cancel the remaining dates (see "Change or cancel an event") and create a new repeating meeting.
Change the details of a repeating meeting
- Open one date of the meeting and click Edit.
- Make the change.
- Under Apply changes to, choose Only this date, or This and all future dates.
- Click Save changes.
This and all future dates copies every field in the form to the later dates, not only the one you changed. A change of time moves each later date by the same amount, and earlier dates never change. Volunteer roles and This year's number change on this date only.
Show an event on your public page and on GuildeHall's events directory
Takes: a minute. Have ready: nothing.
The steps are in Part 1, task 5, under "Change whether an event is on your public page." Once the box is checked, a View public page ↗ link under the event's title opens its own public page.
This works only for a public Guilde. A private or secret Guilde has no public page, so its events don't have the box.
What the public sees
Your public page lists up to five upcoming public events, each repeating meeting once, at its next date. Each event links to its own page, which shows the time, place, description, and cover image, with links to add it to a calendar. A ticketed event's page also takes tickets. Public pages show how many people are going, never their names, and never the video call link.
GuildeHall's events directory
A public Guilde's public events also appear on GuildeHall's directory of events at guildehall.com/events, until each one ends. Part 1, task 5, says how to keep them off it. The change takes effect at once. Members-only events are never listed.
Take free tickets for an event
Takes: a few minutes. Have ready: nothing.
Free tickets tell you how many people to expect, give each party a confirmation code to show at the door, and stop registrations when the event is full.
- In the Create event form, or in Edit on an existing event, check Free ticketing.
- In Capacity, type the number of places, or leave it blank for no limit.
- Click Create event or Save changes.
The event shows a Ticketed label.
How people register
- Members open the event in GuildeHall, choose how many tickets, and click Get tickets. That also marks them as going.
- Anyone else, if the event is on your public page, fills in their name and email on the event's public page and clicks Get free tickets. They don't need an account. On Guilde Standard and Premium, they can also check a box to get the Guilde's email updates, which they then confirm by email.
One registration can be for 1 to 10 people. Registration stays open until the event ends, so people can register at the door. When the event is full, the page says it's at capacity and takes no more.
Each person who registers gets an email titled "You're registered: [event title]" with their confirmation code, links to add the event to a calendar, and a Manage registration button. That button lets them change the size of their party or cancel, without signing in.
A secret Guilde has no pages outside GuildeHall, so its emails work differently. A member's email has an Open the event button instead, which opens the event in GuildeHall, where they can change their party or cancel once signed in. Someone without an account in the Guilde, such as a walk-in you add, gets no button and is asked to tell the Guilde about any change. Both get a Google Calendar link only.
The public registration form takes 30 registrations an hour from one internet connection, enough for a crowd sharing the venue's Wi-Fi. Past that, add people yourself as walk-ins (see the next task).
Check people in at the door
Takes: a few minutes to set up, then a tap for each arrival. Have ready: a phone or tablet signed in to GuildeHall as an admin.
The Registrations card on a ticketed event's page is the door list, and it fits a phone screen.
- Open the event. The Registrations card shows how many tickets are taken and how many people have checked in.
- When someone arrives, find them by scrolling, or by typing their name, email address, or confirmation code into the search box, which appears once more than three people have registered.
- Tap the circle beside their name. It fills in to show the whole party has checked in. Tap it again to undo.
Add someone at the door
- Tap Add walk-in.
- Type their Name, and their Email (optional) if they'd like a confirmation. Set Tickets to the size of their party.
- Tap Add, then tap their circle to check them in.
Walk-ins count toward the Capacity, but you can add them even when the event is full. The card then shows more tickets taken than the capacity, and the public page still takes no more registrations.
Change or cancel a registration
Edit on a row changes the number of tickets, even past the capacity. Cancel cancels the registration after you confirm. If the person gave an email address, they get an email titled "Registration cancelled: [event title]," unless the event has already ended. A cancelled registration stays in the list, grayed out, with a Restore button that puts it back without an email.
Download the list
Click Export CSV. A file named event_registrations.csv downloads, with each registration's name, email, number of tickets, status, how they registered (member, public, or admin), confirmation code, and the times they registered and checked in. The times are in Coordinated Universal Time, five hours ahead of Eastern time in winter and four in summer.
Record who attended
Takes: a few minutes. Have ready: nothing.
For an event without tickets, you can record which members came. A ticketed event uses check-in instead.
- Open the event and click Attendance.
- Check each member who came, and click Save attendance. To find someone, type part of their name in the search box at the top of the window.
The window lists every member of the Guilde, whether or not they answered, with their answer beside their name. Members who said Going come first, then Maybe, then everyone else. Unchecking a name and saving takes them off the list. The Attendance card on the event's page then lists who came. On Guilde Standard and Premium, Email attendees on that card starts a letter to the members who said they were going, which isn't the same as the members you marked.
Ask for volunteers
Takes: a few minutes. Have ready: nothing.
- In the Create event form, or in Edit on an existing event, click + Add role under Volunteer roles.
- Type the role, such as "Set up chairs," and the number of people needed, up to 20.
- Repeat for each role, and save the event.
The event's page shows each role with how many places are filled and who has signed up. Members sign up with Sign up and change their minds with Withdraw. Admins can't sign up someone else. Nobody is notified when a member signs up, so check the event's page.
Each date of a repeating meeting has its own roles and sign-ups. You can rename a role or change its number of places without losing anyone who has signed up. If you set the number lower than the people already signed up, GuildeHall keeps it at the number signed up. Removing a role removes its sign-ups.
Change or cancel an event
Change an event
- Open the event and click Edit.
- Make your changes, and click Save changes.
If the event takes tickets and you change its time or place, the form shows Email registered attendees about the new time or location, checked. Leave it checked to email everyone registered with the new details. With This and all future dates, only people registered for the date you opened are emailed. Members who only said they're going, without tickets, aren't told about changes, so send them a letter or a mass message.
The public setting and the cover image are changed on the event's page, outside the Edit window.
Cancel an event
- Open the event and click Cancel event, in red, set apart from Edit.
- For a one-off event, click Cancel the event. For one date of a repeating meeting, click Cancel only this date, or Cancel this and all future dates.
A cancelled event can't be brought back. Everyone who answered Going, Maybe, or Can't go gets a notice in GuildeHall. Everyone with a ticket and an email address also gets an email titled "Cancelled: [event title]," and so does every member who answered Going or Maybe, unless they've turned off letters from this Guilde or from every Guilde. Nobody gets two emails about the same date, though cancelling several dates sends one for each. No email goes out for a date that has already passed.
The event disappears from the Events list and calendar. Its public page says it has been cancelled, and GuildeHall's events directory shows it as cancelled until its date passes.
What members see
Members open Events to see what's coming. For each event without tickets, they choose Going, Maybe, or Can't go, either in the list or on the event's page. The event's page shows how many have answered each way, with names, to the Guilde's members.
A member's answer is the Guilde's record of who's coming. It doesn't send them reminders, though each event's page has links to add it to their own calendar.
Documents and committees
Share the bylaws, minutes, and other documents
Takes: a minute for each document. Have ready: the file on your computer.
Every member can open the Documents page. Only admins add, change, and delete documents. Members aren't notified when a document is added.
- In the menu, click Documents. If you belong to more than one Guilde, check the Guilde's name at the top of the page first, because the document goes into that Guilde. To change it, click the name and choose another. Then click Upload document.
- Type a Title, such as "Bylaws, as amended 2025," and a Description if you like.
- Choose a Category: Bylaws, Minutes, Newsletter, Annual Report, Policy, or Other.
- Choose who can see it in Visibility. See the next task.
- Under File, choose the file, and click Upload.
The file can be a PDF, a Word, Excel, or PowerPoint file, a plain text or CSV file, or a JPG, PNG, or GIF image, up to 25MB. GuildeHall refuses other kinds, including iPhone HEIC photos and WebP images.
Documents in the Bylaws and Policy categories are pinned. They always appear first, under "Reference documents," so members can find the bylaws however many minutes come after them. Everything else follows, newest first.
Open, change, or delete a document
Click a document's title to open it in a new tab, or ↓ to download it. On a phone, tap the row, then View or Download. On an iPhone, View opens the document in place of the page, and the back arrow returns to the list. Download asks whether to download the file, and saves it in the Files app.
To change a document's title, description, category, or visibility, click Edit beside it, make the change, and click Save changes. A document's file can't be replaced. Delete it and upload the new version.
Delete removes the document and its file after you confirm. It can't be undone.
Once the Guilde has documents, a search box and category buttons appear above the list. The search looks at titles only.
Control who can see a document
Takes: a minute. Have ready: nothing.
Each document is visible to All members or Admins only. Choose when uploading, or change it later with Edit.
An admins-only document doesn't appear in members' lists, and only admins of the Guilde can open it. Admins see it with an Admins only label. Use it for drafts, finances, and anything the board hasn't approved for members.
Set up a committee and its page
Takes: about fifteen minutes. Have ready: the committee's name, who chairs it, and who serves on it.
A committee has its own page in GuildeHall, with a list of its members, a discussion board, documents, and a task list. Every member of the Guilde sees the committee in the list, but only its members and the Guilde's admins can open its page.
Create the committee
- In the menu, click Committees, then New committee.
- Type the Name, and a Description if you like.
- If you administer more than one Guilde, choose the Guilde.
- Click Create.
The committee appears in the list. Creating it doesn't make you a member, so add yourself if you serve on it.
Add its members and chair
- Open the committee, and on the Overview tab click Add member.
- Start typing a name in Search member, and choose the person from the list. Only members of the Guilde who have set up their accounts appear.
- In Role, choose Member or Chair.
- Click Add member.
- Repeat for each member.
Make chair and Demote beside a name change their role, and Remove takes them off the committee after you confirm. A chair can do everything an admin can on the committee's page, except remove another chair or close the committee.
Write the committee's page
- On the committee's page, click Set up page.
- Under About this committee, write what it does, when it meets, and how to help.
- To add links, such as a sign-up sheet or a shared folder, click + Add link and fill in a label and a web address starting with https://.
- Click Save.
The text appears at the top of the committee's page, for its members and the Guilde's admins. The Edit button beside the text changes it later.
Rename or close a committee
To change the committee's name or description, click Edit beside its name at the top of its page, make the change, and click Save. The chair or any admin can do this.
When a committee's work is done, an admin can close it:
- On the committee's page, click Close committee, beside its name.
- Confirm.
A notice at the top of the page says the committee is closed. It leaves the list of committees for everyone except admins, who see it under "Closed committees" at the bottom of the list. Its page, members, documents, discussion, and tasks are all kept. To bring it back, an admin opens it from "Closed committees" and clicks Reopen.
Use the tabs
- Discussion holds the committee's own threads, apart from the Guilde's forum. + New Thread starts one.
- Documents holds the committee's files. Committee members upload with Upload, and the chair or an admin can delete them. They take the same kinds of file as the Guilde's documents.
- Tasks is a to-do list. New task adds one, with an assignee and a due date if you like. Start, Complete, and Reopen move a task along, and an overdue task is marked in red. Nobody is reminded of due dates, so check the list at each meeting.
The wall and the forum
The wall and the forum both hold members' posts, for different purposes. The Wall is a notice board for short news and reminders. It keeps the Guilde's 50 most recent posts and removes older ones, without warning. Posts on the public page don't count toward the 50 and are never removed. The Forum is for longer conversations worth keeping, sorted by topic, and nothing in it expires.
Any member can post on either. There's no charge for them on any plan.
Post an announcement on the wall
Takes: a minute. Have ready: nothing.
- In the menu, click Wall.
- Type the announcement in the box at the top, up to 500 characters.
- To add pictures, click + Add images and choose up to four JPEG, PNG, GIF, or WebP files of 5MB or less each. + Add another adds more, up to four in all, and × beside a file's name takes it off.
- If you belong to more than one Guilde, click Choose… beside Post to, check the Guilde or Guildes it's for, and click Done. All my Guildes checks every one.
- Click Post.
The post appears at the top of the wall, and a dot appears beside Wall in other members' menus until they look. Members aren't emailed about new posts.
To mention a member, type @ and the start of their name, and choose them from the list. They get a notice in GuildeHall, and an email unless they've turned off Mention notifications under My Account. If you add a mention later by editing a post or reply, only the newly mentioned member is notified.
Your own posts have Edit and Delete, and Delete asks you to confirm. Under any post, Replies shows the replies, which GuildeHall also calls comments, and a box to add one.
Your own replies have Edit and Delete too. Edit opens the reply in a box, with Save and Cancel. Admins see Delete beside every reply under their Guilde's posts. Delete asks you to confirm, and the reply is replaced with "This reply was removed." so the replies around it still read in order. Any reports about a deleted reply are marked dealt with. A deleted reply can't be brought back.
Put a post on your public page
In a public Guilde, admins see Show on public page under every post. Click it to add the post to the "Recent posts" card on your public page, which shows the five most recent you've chosen, without pictures, and names the writer by first name and last initial. The post shows an On public page label. Remove from public page takes it off.
Private and secret Guildes have no public page, so they don't have this button. A post on the public page stays on the wall for as long as it's there. Once you take it off, it counts toward the wall's 50 again.
Hide someone else's post
Admins see Hide beside other members' posts. Click it and confirm. The post comes off the wall for everyone, including the person who wrote it, and any reports about it are marked dealt with. GuildeHall doesn't tell the writer, so speak to them if it's needed. To put the post back, click Moderation at the foot of the "Needs your attention" list on the Admin Dashboard, then Hidden, then Unhide beside the post.
Organize the forum
Takes: a few minutes for each job here, or about ten to set up categories. Have ready: nothing.
Start a thread
- In the menu, click Forum, then + New Thread.
- Type a Title, choose a Category if you like, and write the Content, up to 5,000 characters. The B, I, and Quote buttons format the text.
- Click + Add image to attach up to four pictures, if you like.
- Click Create Thread.
You're subscribed to the thread automatically, so you get a notice in GuildeHall when someone replies. Members can also get an email for each reply by turning on Forum replies under My Account. It starts off.
Set up categories
Categories sort the forum by topic. Every Guilde starts with General, Announcements, Questions, and Planning.
- On the Forum page, click Manage beside the category buttons.
- To add one, type it in New category name and click Add.
- Rename changes a category's name, and the arrows reorder the list. Delete removes a category after you confirm, and leaves its threads in place, without a category.
Members click a category button to see only its threads. The search box searches every thread and reply.
Pin, lock, or delete a thread
Open the thread and click ⋯ beside Subscribe:
- Pin to the top keeps the thread at the top of the forum, for standing information such as how to reach the board. Unpin from the top reverses it.
- Lock replies stops members from replying. Admins can still reply, for example to add a closing note, and the reply box tells them so. Allow replies again reverses it.
- Delete thread deletes the thread and every reply after you confirm. It can't be undone.
GuildeHall asks you to confirm before pinning, unpinning, or locking a thread. A member who started a thread can delete it while nobody has replied. Members delete their own replies with Delete, after confirming, and admins can delete anyone's, leaving "This post was removed." in its place. The opening post of a thread can't be deleted on its own. Delete the thread instead.
Add a poll
Polls are added when a thread is started, not afterward.
- In the New Thread form, click + Add a poll.
- Type the Poll question, and two to six Options. Click + Add option for more.
- To end voting on a date, set Closes. Otherwise it stays open until someone closes it.
- Create the thread.
Members vote once and can change their vote until the poll closes. They see the results after voting. The thread's author or an admin can click Close poll at any time, and confirm.
If your Guilde belongs to a Council
A Guilde in a Council shares the Council's forum with the other Guildes in it, and has no forum of its own. The top of the Forum page says so. Admins of every Guilde in the Council can pin, lock, and delete threads and change the categories, including your Guilde's. A committee's discussions stay with the committee either way. "Join a Council" explains Councils.
Handle a reported post
Takes: a few minutes. Have ready: nothing.
Any member can report a wall post, a reply, or a forum post by clicking ⋯ beside it, choosing Report, and giving a reason. GuildeHall doesn't email admins about a report. The Admin Dashboard lists it under "Needs your attention," and a dot appears beside Admin Dashboard in the menu.
- On the Admin Dashboard, click the line about posts reported for review. The Moderation page opens, showing open reports.
- Read the reason and the reported text.
- Choose what to do:
- Hide Post takes a wall post off the wall. Hide Comment replaces a reply with "This comment has been hidden by a moderator." GuildeHall asks for a reason, which only admins see.
- Delete Post removes a forum post, leaving "This post was removed." in the thread.
- Mark Resolved closes the report without removing anything, when the post is fine.
Hiding a post or reply also closes its report. After deleting a forum post, click Mark Resolved as well. Neither the writer nor the person who reported it is told.
The Resolved tab lists reports already dealt with. The Hidden tab lists the wall posts and replies hidden in this Guilde, newest first, with the reason given. Click Unhide to put one back on the wall. A deleted forum post can't be brought back.
Your public page
Every public or private Guilde has a page on the open web. It's how people who aren't members find the Guilde, and search engines and AI assistants read it too.
See your public page as a stranger sees it
Takes: a few minutes. Have ready: nothing.
The steps are in Part 1, task 2, under "Look at your public page." Any member can open the page that way. A secret Guilde has no public page.
What a public Guilde's page shows
From top to bottom, a public Guilde's page shows only the sections it has something for:
- The Guilde's name, its city and state, and its About text.
- Meetings: the meeting schedule, place, and address. With only an address filled in, the card is headed Location.
- Become a member, if the Guilde takes dues online, with its membership tiers and a Join button. See "What members see when they pay."
- Get updates by email, where visitors join the mailing list. It appears only on Guilde Standard and Premium.
- Upcoming events: up to five events you've chosen to show.
- Recent posts: up to five wall posts you've chosen to show.
- Recent letters: up to five sent letters you've chosen to show.
- Officers: the Leadership list, by title and first name and last initial.
- Part of: the Council the Guilde belongs to, if any.
- Get in touch: a form for questions, which arrive on your Inquiries page.
- Find us online: the website, public email, and Facebook page.
The details come from Settings, in Guilde Details. The roster, documents, the forum, and members-only events never appear.
What a private Guilde's page shows
A private Guilde's page shows its name, its city and state, "Membership by approval," and a Request to join form. Requests arrive on your Inquiries page, as "Answer people who write through your public page" explains.
Choose public, private, or secret
Takes: a minute. Have ready: nothing.
Part 1, task 2, covers the setting itself, under "Choose who can find your Guilde." Changing it later has these effects:
- Leaving public takes down the public event pages, the email signup form, online joining, the public letters archive, and the Guilde's listings on GuildeHall's events directory. Members, posts, events, and the mailing list are unaffected. They all come back if the Guilde becomes public again.
- A private Guilde keeps a short page with the request form. A secret Guilde's page is removed entirely, so its old address shows "not found."
- A Guilde in a Council, or waiting to join one, can't become secret. GuildeHall asks you to leave the Council, or cancel the request, first.
GuildeHall doesn't ask you to confirm the change. The card says "Saved" as soon as you click Save.
Join a Council
Takes: a few minutes, then a wait for GuildeHall's approval. Have ready: nothing.
A Council joins Guildes of the same kind, such as the neighborhood associations of one city, so they share a forum and appear together on a Council page. GuildeHall sets up each Council and approves each Guilde that asks to join. A Guilde belongs to one Council at most, and a secret Guilde can't join one.
The Council Memberships card appears on Settings once there's a Council your Guilde could join. If your Guilde has forum threads, delete anything private from the forum before you start, because the Council's other Guildes will be able to read them.
- On Settings, in the Council Memberships card, click Browse Councils to join.
- Read the Councils listed, and click Request to join beside one.
- If your Guilde has forum threads, check the box confirming you understand the Council's other Guildes will be able to read them.
- Click Send request.
The card says the request is waiting for approval and shows Pending approval. When GuildeHall approves it, every admin of your Guilde who has set up their account gets an email titled "[Guilde name] has joined the [Council name] Council," saying how many forum threads moved, if any did, and the card shows Active. Cancel withdraws a pending request after you confirm.
What changes when you join
Your Guilde's forum threads move into the Council's forum, and from then on your members use the Council's forum, shared with the other Guildes. Committee discussions don't move. Your public page lists the Council under Part of.
To leave, click Leave in the card and confirm. Threads your Guilde wrote stay in the Council's forum, and your members stop seeing them. Your Guilde starts a new forum of its own.
Your plan
The Guilde Plan card on Settings shows which plan your Guilde is on. "What's free, and what the Standard plan adds," at the front of this manual, compares the plans.
Move to the Standard plan
Takes: about five minutes. Have ready: the card the Guilde pays with.
Part 1, task 2, has the steps, under "Check your plan." Annual billing is chosen to start with, and costs ten months' price for twelve.
Once Stripe confirms the payment, usually within a minute, the Guilde can send letters, set up online dues, and grow past 150 members. GuildeHall doesn't send a separate email to confirm the plan.
If your Guilde is a charter Guilde, the card says "complimentary" through a date, and there's nothing to pay or manage.
Change your billing or card
Takes: a few minutes. Have ready: the new card, if you're changing it.
- On Settings, in the Guilde Plan card, click Manage billing. Stripe's billing page opens.
- On Stripe's page, change the card, update the billing name, email, address, or phone, see and download past invoices, change the plan, or cancel it.
- Click Return to GuildeHall Network, at the left, when you're done.
To move between Standard and Premium, or between monthly and annual billing, click Update subscription. Choose Monthly or Yearly at the top, click Select beside the plan, and click Continue. Stripe shows what the Guilde will pay, and from when, before you click Confirm. The Guilde Plan card on Settings shows the new plan straight away.
Cancelling takes effect at the end of the period already paid for, with no refund for the rest of it. Until then the Guilde keeps its plan, and the card says it ends on that date and won't renew. Stripe's page lets you take the cancellation back before then.
If a payment fails, the card says "There's a problem with this Guilde's payment," with an Update card button that opens the same page. Every admin who has set up their account also gets an email. While Stripe tries the card again, the plan stays on.
If the plan ends
The Guilde returns to Guilde Free, and nothing is deleted.
- Drafts of letters are kept, and new ones can be written, but not sent. A letter scheduled for after the plan ends goes back to the drafts instead of going out, and the officer who scheduled it gets a notice under the bell.
- The Guilde stops collecting dues online. Members can't pay online, and the public page's Become a member card disappears. Within the hour, every automatic renewal is set to stop at the end of the term the member has already paid for. Nothing is refunded, and nothing more is charged. Each of those members gets an email saying their membership won't renew automatically and asking them to pay the treasurer directly from then on. You can still record cash and check payments, and the payment history stays.
- If the Guilde returns to Standard, members who want automatic renewal turn it back on themselves, on their Membership page, or, once their term has ended, pay again with automatic renewal on.
- If the Guilde has more than 150 members, nobody is removed, but no one new can be added until it's below 150 or back on Standard.
Your own account
These tasks are for every member, officers included. Most are on the My Account page, which opens from the menu. One account covers every Guilde you belong to, so these settings apply in all of them.
My Account starts with Personal Information: your name, a few lines About Me shown on your profile, a Forum Signature shown under your forum posts, and your phone, date of birth, and address. Click Save Changes after changing them. See your profile as other members see it, at the top, shows the result.
Change your password
Takes: a minute. Have ready: nothing.
- On My Account, find Change Password.
- Type your Current Password, then the new one in New Password and again in Confirm New Password. It needs at least eight characters, including an uppercase letter, a lowercase letter, a number, and a symbol such as ! or #. The list under New Password ticks off each rule as you meet it.
- Click Change Password.
A message says your password has changed. Any other computers and phones where you were signed in are signed out, and need the new password. This one stays signed in.
If you've forgotten it
- On the sign-in page, click Forgot your password?
- Type your email address and click Send Reset Link.
- Open the email titled "Password Reset - GuildeHall Network" and click Reset Password. The link works for one hour.
- Type the new password twice, and click Reset Password.
The page says your password has been reset, and Sign In takes you back. Resetting a password signs you out on every computer and phone, so sign in again on each with the new one. It doesn't turn off two-step sign-in.
Use two-step sign-in, and what to do without your phone
Takes: about ten minutes to set up. Have ready: nothing.
Part 1, task 1, covers turning it on. The Two-step sign-in section appears on My Account for admins, and for anyone who has it on.
Sign in without your phone
On the sign-in page, after your password, click Don't have your phone? Use a backup code, and type one of the ten backup codes you saved. Each code works once. The Two-step sign-in section says how many you have left.
Move it to a new phone
- Sign in, using the code from your old phone or one of your backup codes.
- On My Account, in Two-step sign-in, click Turn off. Type the code from your app, or a backup code, and click Turn off again.
- Set it up again on the new phone, as in Part 1, task 1.
Setting it up again also gives you a fresh set of backup codes. Do the same when you're down to your last two or three.
If you've lost your phone and your backup codes
No one in your Guilde can reset it. Write to GuildeHall, as the sign-in page says, and see "Getting help" in Part 3.
Control what other members see about you
Takes: a minute. Have ready: nothing.
On My Account, under Privacy Settings, each switch saves the moment you click it, and "Saved" appears briefly:
- Show email address, Show phone number, and Show address let other members see each on your profile. All three start off.
- Appear in roster lists you in the member directory. It starts on. Turned off, you're also left out of the names suggested when someone types @ to mention a member. Admins still see you in the directory.
- Allow direct messages lets other members write to you. It starts on.
Admins of your Guilde can always see your email address, phone, address, and date of birth, because they keep the member list. Members of other Guildes in the same Council see only your name and what you've written about yourself. Nobody else can see your profile.
Choose which emails you get
Takes: a minute. Have ready: nothing.
On My Account, under Email Preferences, each switch saves the moment you click it:
- Guilde newsletters: letters and event announcements from your Guildes. Turning this off stops them from every Guilde.
- Mention notifications: when someone mentions you with @.
- Direct messages: when another member writes to you.
- Comments on my posts: when someone replies to your post on the wall.
- Forum replies: when someone replies to a forum thread you follow. This one starts off, because a busy thread can send a lot of mail.
Emails about your account, such as password resets, invitations, ticket confirmations, and the thank-you for dues paid online, always arrive.
Stop one Guilde's letters but not another's
If you belong to more than one Guilde, click set newsletter preferences per Guilde under Email Preferences. A page opens listing each Guilde, with Mute or Resume beside it. The Unsubscribe link at the foot of any letter opens a page with an Unsubscribe from [Guilde name] button, which stops only that Guilde's letters. Email preferences, beside it, opens the page of every Guilde.
To start receiving a Guilde's letters again after unsubscribing, open that page and click Resume. If Guilde newsletters is off on My Account, turn it back on as well.
Work in more than one Guilde
Takes: nothing to set up. Have ready: nothing.
One account holds every Guilde you belong to. Some pages combine them, and others take one Guilde at a time:
- Wall, Events, Messages, and your notices under the bell at the top of the screen combine every Guilde. Each post, event, and message is marked with the Guilde it belongs to.
- Home, Roster, Documents, Forum, and Membership take one Guilde at a time. The Guilde's name sits at the top of the page with a small arrow beside it. Click the name to open a list of your Guildes, and click another to switch. GuildeHall remembers the one you last chose.
- The Admin pages work on one Guilde at a time. If you're an admin of more than one, the Guilde's name appears under "Administering" at the top of every Admin page. Click it and choose another Guilde to switch.
The top of the menu reads My Guildes instead of a Guilde's name, and takes you to the home page of the Guilde you last chose.
On another member's profile, and in a message with them, "Also in" lists the Guildes you share.
Leave a Guilde
Takes: a minute. Have ready: nothing.
- On My Account, find Your Guildes, which lists every Guilde you belong to.
- Click Leave beside the Guilde, and confirm.
GuildeHall opens your home page, and the Guilde is gone from your menu and pages. You come off its member list and its Leadership list. Any automatic dues renewal stops, so you aren't charged again, and the time you've already paid for runs to its end date. Your posts, replies, and forum threads stay where they are, and your account and your other Guildes aren't affected. The Guilde's admins aren't emailed, but its Audit Log records that you left. To come back, ask one of its admins to add you again.
If you're the Guilde's only admin, GuildeHall won't let you leave until you make someone else an admin on the Members page. If Stripe can't be reached to stop an automatic renewal, you stay in the Guilde, and the message asks you to try again in a few minutes.
Put GuildeHall on your phone's home screen
Takes: a minute. Have ready: nothing.
GuildeHall isn't in the app stores. You can put it on your phone's home screen instead, where it opens like an app, without the browser's address bar.
- On an iPhone, open network.guildehall.com in Safari. Tap the Share button, a square with an arrow pointing up. It's in the address bar, or under ⋯ at the bottom right, depending on how Safari is set up. Then tap View More, then Add to Home Screen. Leave Open as Web App on, and tap Add. If there's no View More, Add to Home Screen is in the list the Share button opens.
- On an Android phone, open network.guildehall.com in Chrome. Tap ⋮ at the top right, then Add to home screen, or Install and create shortcut in newer versions of Chrome, then Install.
The icon is GuildeHall's G crest, named "GuildeHall." The first time you open it, sign in again: the home-screen icon keeps its own sign-in, apart from the browser's. After that it opens to your Guilde's home page. GuildeHall doesn't send phone notifications.
Download your data, or delete your account
Takes: a minute. Have ready: nothing.
At the bottom of My Account, under Account:
- Download my data saves a file of everything GuildeHall holds about you: your profile, memberships, posts, messages, and more.
- Delete account removes your account after you type DELETE and click Permanently delete. Your name and contact details are cleared, and your posts stay with "[deleted]" in place of your name. It can't be undone.
If you're the only admin of a Guilde with other members, GuildeHall won't delete your account until you make someone else an admin, or delete the Guilde under Settings, so the Guilde isn't left with nobody to run it.
Part 3: Help
This part answers common questions about GuildeHall, explains how to reach GuildeHall when something goes wrong, and defines the words the app uses. The printed manual ends with an index.
Frequently asked questions
Do members pay anything to use GuildeHall?
No. Members never pay GuildeHall, and they can belong to as many Guildes as they like. Your Guilde pays for its plan, and Guilde Free costs nothing. Dues are what your Guilde charges its own members, and the money goes to your Guilde.
Do we have to collect dues online?
No. On every plan, including Guilde Free, you can add membership tiers, record checks and cash, and see who has paid. Collecting dues online needs Guilde Standard. If some members still pay by check, record those payments as "Record a check or cash payment" describes.
Does GuildeHall take a share of our dues?
No. When a member pays online, the money goes from their card to your Guilde's own bank account, and GuildeHall takes none of it. Stripe, the payment company, keeps its fee of about 2.9% plus 30¢ for each card payment.
What happens when we reach 150 members?
On Guilde Free, no one new can join or be added once the Guilde has 150 members. Nobody already in it is removed, but invitations already sent can't be accepted until the Guilde moves to Guilde Standard. Mailing-list contacts don't count toward the limit. Guilde Standard lifts the limit, and "Move to the Standard plan" gives the steps.
Does every member need to set up an account?
No, only to use the site: to see the roster and documents, answer events, post, or pay dues online. Letters reach every member you've added, including those who haven't set up an account yet, unless they've unsubscribed. A member marked Invited already has a GuildeHall account and starts receiving letters once they accept. A member who never uses a computer can stay on the member list, and you can record their dues by check.
Can members see each other's phone numbers and addresses?
Only if each member chooses to show them. Members see each other's names. Email address, phone number, and mailing address are hidden until the member turns them on under My Account, and other members never see a date of birth. Admins see the full record, because they keep the member list. "Control what other members see about you" lists the settings.
Who can see our Guilde on the internet?
Anyone can find a public Guilde's full page. A private Guilde's page shows only its name, city and state, and a form to ask to join. A secret Guilde has no page at all. Nothing inside the Guilde, such as the roster, the wall, or the documents, is visible to anyone who isn't a member, unless an admin puts a post, event, or letter on the public page. A public Guilde's page also lists its Leadership. If your Guilde joins a Council, its forum is shared with the Council's other Guildes, whose members can also see your members' names and what they've written about themselves. "Choose public, private, or secret" explains the choice.
Does GuildeHall show ads, track members, or use our content to train AI?
No. GuildeHall has no advertising and no analytics, so no outside company sees what your members do on the site. Your members' posts, messages, and records are never used to train AI models.
Can we see who opened a letter?
No. Each letter shows how many copies were delivered and how many bounced, because members' email providers report it. GuildeHall doesn't record who opens a letter or clicks its links. "See who your letter reached" explains the counts.
A member says they didn't get our letter. What should I check?
First ask them to look in their spam or junk folder. Then check two things. On the Members page, a row marked Undeliverable means their address bounced, and letters skip it. In the member list you download from Members (see "Download the member list"), a gets_letters column reading "no" means the member turned the Guilde's letters off, or their address is Undeliverable. "When a member says letters have stopped" explains what to do in each case.
Can one person belong to more than one Guilde?
Yes, with a single account. Pages such as Wall and Events combine all of a person's Guildes, and pages such as Roster and Documents show one at a time. "Work in more than one Guilde" explains how.
Is there a phone app?
No. GuildeHall isn't in the app stores, but members can put it on their phone's home screen, where it opens like an app. "Put GuildeHall on your phone's home screen" gives the steps for iPhone and Android.
What happens when our officers change?
The outgoing officers make the incoming ones admins, update the Leadership list, and hand over the Stripe account, then step down. The Guilde's records stay where they are. "Hand the Guilde over to next year's officers" gives the steps, in order.
Can we take our records with us if we leave?
Yes. Any admin can download the member list, the contacts, the payments, and each event's registrations as spreadsheet files, and documents can be downloaded one at a time. Each member can download everything GuildeHall holds about them from My Account. Online payments are also recorded in your Guilde's own Stripe account.
Can we change our Guilde's name or web address?
Any admin can change the name, in the Guilde Details card on Settings (see "Fill in the details" in Part 1, task 2). The web address of your public page stays the same, because letters, search engines, and other websites link to it. To change the web address, write to GuildeHall, as "Getting help" explains.
Getting help
Write to Brandon Quintin, GuildeHall's founder, at [email protected], or call 802.735.6749.
As of November 2026, he makes three promises to every Guilde:
- He will set up your Guilde with you from start to finish, including importing your member list.
- He will meet with your officers in person, or by phone or video call if that suits you better.
- He will usually reply the same day.
What to include
Say which Guilde you're writing about, which page you were on, what you clicked, and what happened. A screenshot helps, attached to your email:
- On a Mac, press Shift, Command, and 3 together. The picture is saved to your desktop.
- On a Windows computer, press the Windows key, Shift, and S together, and drag across the screen. Then paste the picture into your email.
- On an iPhone, press the side button and the volume-up button together. The picture is saved to Photos.
- On most Android phones, press the power button and volume-down together. The picture is saved to your photo gallery.
What only GuildeHall can do
Some changes have no button in the app. Write to GuildeHall to:
- Change the web address of your Guilde's public page.
- Turn off two-step sign-in for someone who has lost both their phone and their backup codes.
- Clear an Undeliverable mark once a member's email address works again.
- Set up a Council, or approve your Guilde's request to join one.
Write too if a Stripe screen doesn't match the steps in Part 1, task 4, or if anything in the app doesn't match this manual.
Problems with Stripe itself
GuildeHall can't sign in to your Guilde's Stripe account or change who owns it. If the owner of the Stripe account can't be reached, write to Stripe Support at support.stripe.com, as "Hand over the Stripe account" explains.
Glossary
These are the words the app and this manual use. Bold words inside a definition are the app's own labels, as they appear on screen.
Admin. A member who can also open the Admin pages, where they add members, collect dues, send letters, and change the Guilde's settings. A Guilde can have as many admins as it likes. Officers are usually admins.
Admins only. A setting on a document that hides it from members. Only the Guilde's admins can see and open it.
Authenticator app. A free phone app, such as Google Authenticator or Microsoft Authenticator, that shows a new six-digit code every thirty seconds. Two-step sign-in uses it.
Automatic renewal. A choice a member makes when paying dues online. Their card is charged again at the end of each membership period, until they or an admin stop it.
Backup codes. Ten one-time codes GuildeHall gives you when you turn on two-step sign-in. Each one signs you in once without your phone.
Become a member. A card on a public Guilde's page, shown when the Guilde takes dues online, where new people choose a membership, join, and pay in one step.
Bounced. A letter that the reader's email provider refused. If the address doesn't exist, or the reader reported the letter as spam, the address is marked Undeliverable. A temporary refusal, such as a full mailbox, doesn't mark it.
Category. A topic in the forum, such as General or Planning. Every Guilde starts with four, and admins can add, rename, or delete them.
Charter Guilde. One of the first Guildes to join GuildeHall, which has Guilde Standard at no charge for the period in its agreement.
Committee. A smaller group within the Guilde, with its own page, members, chair, discussion board, documents, and task list.
Communications. The admin page where you write and send letters, send a mass message, and set your letters' masthead and color.
Contact. A person on the Guilde's mailing list who isn't a member. Contacts receive letters, can't sign in, and don't count toward the 150-member limit.
Council. A group of Guildes of the same kind, such as the neighborhood associations of one city, which share a forum and a public page. GuildeHall sets up each Council. Joining one is optional.
CSV file. A plain spreadsheet file that Excel, Numbers, and Google Sheets can open and save. GuildeHall imports member lists from CSV files and exports its lists as CSV files.
Danger Zone. The card at the bottom of Settings that holds making another member an admin, Step down as admin, and deleting the Guilde.
Dispute. A member's request to their bank to reverse a card payment. GuildeHall emails the admins and marks the payment Disputed.
Dues. What your Guilde charges its members. Members pay them online or by check or cash, and the money goes to the Guilde. GuildeHall takes none of it.
Events directory. GuildeHall's public list of events at guildehall.com/events. A public Guilde's public events appear there unless the Guilde turns the listing off.
Forum. The place for longer conversations worth keeping, sorted by category. Nothing in it expires.
gets_letters. A column in the downloaded member list. It reads "no" for a member who has turned off the Guilde's letters or whose address can't receive mail.
Guilde. Any group on GuildeHall: an association, club, society, or other organization.
Guilde Free, Guilde Standard, Guilde Premium. The three plans. Free costs nothing for up to 150 members and sends letters to all of them. Standard adds collecting dues online and the full newsletter, and lifts the limit. Premium adds priority support.
Inquiry. A message sent through the Get in touch or Request to join form on your public page. Inquiries arrive on the Inquiries page.
Invitation. The email a person receives when you add them and they already have a GuildeHall account, for example from another Guilde. Their row shows Invited until they accept.
Invite link. A web address you share so that people can join the Guilde themselves, without an officer adding them.
Join link. The address of your public page's join-and-pay form, shown on the Dues page once members can pay online.
Lapsed. A member who has paid dues before and whose membership has ended. A lapsed member keeps using GuildeHall as before.
Leadership. The list of officers and their titles shown on your home page and public page. Being on it doesn't make someone an admin.
Letter. An email from your Guilde to its members, its contacts, or both, written on Communications. It's what a newsletter service such as Mailchimp sends.
Letter color. The color used for headings, links, and buttons in your Guilde's letters.
Lock. Stopping new replies to a forum thread.
Mass message. A notice sent inside GuildeHall, to Messages and the bell at the top of the page, with no email.
Masthead. A standing header image that every new letter starts with, such as a banner with the Guilde's name or logo.
Member. Anyone in your Guilde. Members see every menu item above Admin.
Membership tier. A kind of membership the Guilde offers, such as Individual or Household, with its price and length.
Mention. Typing @ and a member's name in a post, to send them a notice.
Moderation. The admin page that lists posts members have reported.
Needs your attention. A card on the Admin Dashboard listing work waiting for an admin: new inquiries, reported posts, members who haven't set up their accounts, and unsent drafts.
Not set up. A member who has been added but hasn't yet chosen a password from their setup email.
Officer. A person who holds a post in your Guilde, such as president or treasurer. Officers are usually admins. "Make each officer an admin" gives the steps.
Paid up. A member whose membership hasn't ended, including anyone covered by someone else's household or business membership.
Payout. A transfer of collected dues from Stripe to your Guilde's bank account.
Pending confirm. A contact who signed up on your public page and hasn't yet clicked the link in their confirmation email.
Pin. Keeping a forum thread at the top of the list.
Public, private, secret. The three settings for who can find your Guilde. "Choose public, private, or secret" explains them.
Public page. Your Guilde's page on the open web, at network.guildehall.com/g/ followed by your Guilde's short name. People who aren't members see it.
Report. A member's request that admins look at a post. Reports appear on Moderation.
Roster. The member directory every member can open. Each member chooses what it shows about them, or leaves it altogether. Members who haven't set up their accounts don't appear in it.
Setup email. The email a new member receives, titled "Set up your account," with a link to choose a password. The link works for seven days.
Stripe. The payment company that handles dues paid online. Each Guilde has its own Stripe account.
Stripe Dashboard. Stripe's website for your Guilde's account, where the account's owner and team see payments and payouts and give refunds.
Subscribed. A contact who receives your letters and hasn't unsubscribed.
Tag. A label you put on members, such as "Block captain," so that you can show only those members or send them a letter.
Thread. A conversation in the forum: an opening post and its replies.
Ticket. A free registration for an event, with a confirmation code to show at the door.
Two-step sign-in. An optional extra step at sign-in, where you type a code from your phone after your password.
Undeliverable. An email address that was refused permanently, or whose owner reported a letter as spam. Letters skip it.
Unsubscribed. A contact or member who has asked not to receive letters. GuildeHall gives admins no way to sign them up again.
Wall. The Guilde's notice board for short news and reminders. It keeps the 50 most recent posts, not counting posts on the public page.
Walk-in. Someone an admin registers at the door of a ticketed event.
Appendix A: Welcome letter to your members
Copy this letter, fill in everything in square brackets, and send it as described in task 7. Delete the sentence about dues if your Guilde doesn't take dues online.
GuildeHall starts each letter with "Hi" and the member's first name. When you send through GuildeHall, put the subject in Subject, and copy the letter from its first paragraph down. When you send from your own email account instead, keep the "Hi everyone" greeting.
Subject: [Guilde name] is moving to GuildeHall
Hi everyone,
[Guilde name] now has its own member site on GuildeHall Network. We'll use it in place of [what it replaces, such as the spreadsheet and the group email chain].
You'll get a separate email from GuildeHall, if you haven't already, with a link to set up your account. Click the link and choose a password within seven days, before the link expires. If you don't see the email by [date], check your spam folder or let me know, and I'll send it again.
Once you've signed in, you can see who's in the group and what's coming up, say whether you're going to events, post on our wall (a bulletin board for the group), and message other members. You can also pay your dues there.
Using the site costs you nothing, and it works in your phone's web browser, so there's nothing to install. You decide whether your phone number and address appear on the member list. To choose, click My Account in the menu after you sign in.
Our next meeting is [date] at [place], and you can tell us on the site whether you're coming. If you have any trouble getting set up, reply to this email or call me at [phone number].
Thanks,
[Your name]
[Your title], [Guilde name]
Appendix B: What to have ready for Stripe
Print this page and fill it in before you set up dues in task 4. Keep it somewhere safe afterward, or shred it, since it holds bank and personal details.
The Guilde
Legal name, as on its tax records: ______________________________________
Mailing address, as on its tax records: ______________________________________
Tax ID number (EIN or nonprofit ID), if it has one: ____________________
Incorporated as a nonprofit, or an unincorporated association? ____________________
The Guilde's bank account (not a personal account)
Bank: ______________________________________
Routing number: ____________________ Account number: ____________________
You, as the person responsible for the account
Email address for your Stripe login: ______________________________________
Mobile number for text codes: ____________________
You'll also enter your date of birth and the last four digits of your Social Security number. Don't write those here.
Along the way
- To secure your Stripe login, click your phone under the Next button to get codes by text. If you use an authenticator app, you can scan Stripe's QR code with it instead.
- Choose the free option for fraud protection.
- Click Not right now when Stripe offers help with sales tax, and skip other extras such as Climate.
- To stop partway, close the window. Finish Stripe setup → on the Dues page picks up where you left off.